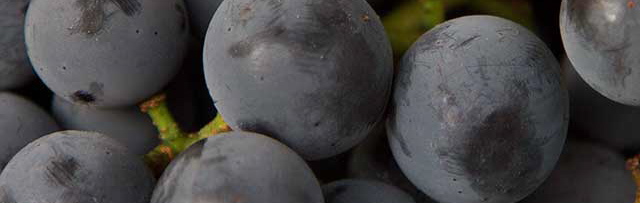
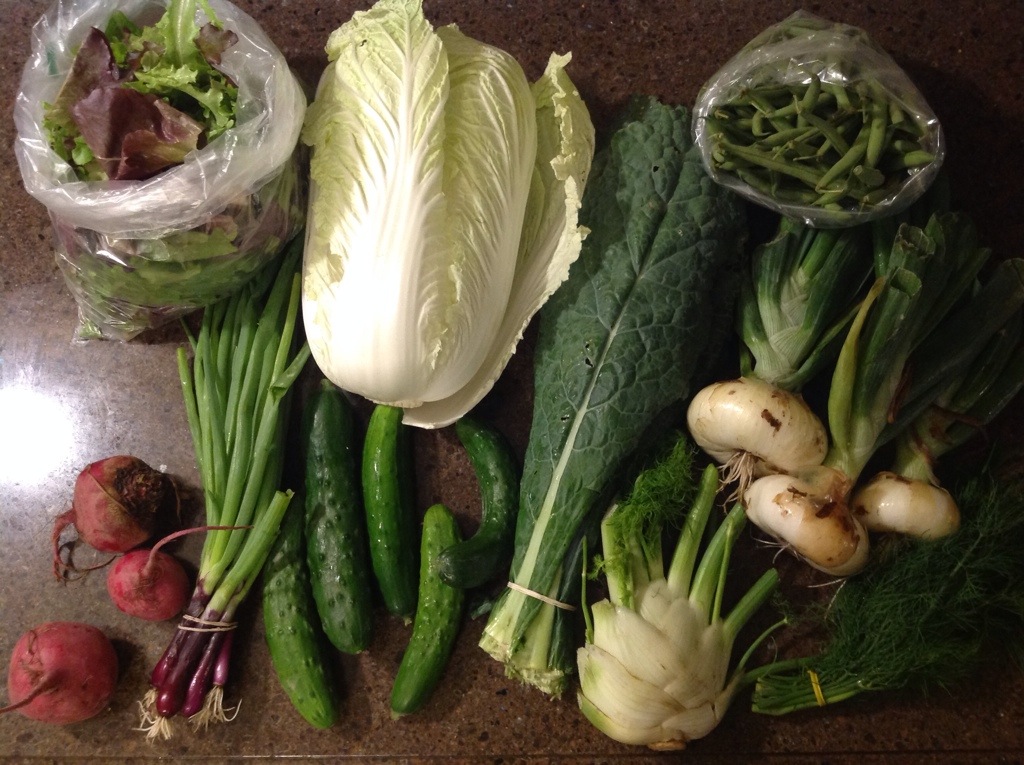
We got a healthy load of cucumbers this week. I’m completely OK with that. First, I’m at my fermenting workshop this week learning all about lactic acid fermentation and making old-fashioned “sour” pickles. Second, there’s nothing to beat the heat like an ice-cold cucumber. We’ll see what happens.
I’m also happy to see an influx of full-sized onions. We’ve been running low on aromatics over the past week. Spring onions are past, green garlic is scarce, and there’s not a ginger root or shallot to be had.
A steam canner. A water bath canner with a rack to hold jars. A pressure canner with a gauge to tell the inside pressure.
Canning is the process of sterilizing and sealing food into air-tight glass jars. Canned goods can last for years at room temperature as long as the seal is intact. Foods that have been canned can retain most of the nutrients and flavors of the fresh food, and, for some foods, canning actually helps release nutrients and flavors that aren’t present in the raw food. I’m going to explain differences among the three types of canning to help you decide when to use each method.
The whole point of canning is to heat up food to kill off any wee beasties that might spoil the food. The most concerning wee beastie is Clostridium botulinum which produces botulism toxin, a powerful neurotoxin. C. botulinum mostly hangs around in a spore form which can only be killed with heat over 240F, but can start metabolizing and producing the toxin in low-acid environments. Additionally, heating up the food also heats up the air in the jar, and as the jar cools, the rubber seal helps form a negative pressure space that seals the lid onto the jar.
There’s three types of canning: steam, water and pressure. Each method has a different way to heat up the contents of the jars and kill off wee beasties.
Steam canning uses a little bit of water which is vigorously boiled to envelope the jars in hot steam to raise the temperature of the jar contents. I personally don’t use a steam canner. I realize that the thermo-conductive potential of hot gas is the same as hot liquid, but something about it gives me the willies… I can’t believe that a hot gas is enough to sterilize my food. Additionally, most canning books that I have tested their recipes in water bath or pressure canners. And, by “testing” recipes, I’m not talking about tasting only for flavor, but also to ensure the food is sterile and sealed. Untested recipes could mean unsealed jars or not sterile foods. I’m not willing to take the risk of converting recipes to steam canning from other canning methods.
Water bath canning uses boiling water at 220F (or thereabouts, depending on your altitude) to sterilize the jar contents. However, some wee beasties still thrive at temperatures above 220F, but, lucky for us, they can’t survive in acidic, sweet or salty environments. So, if a food is sweet, salty or sour (e.g. jams, pickles, naturally acidic fruit) then you only have to heat it up to 220 to kill off most of the wee beasties, then the sweet, salt or acid keeps the other beasties from metabolizing and spoiling your food. A water bath canner is nothing fancy, just a deep pot with a lid.
Unfortunately, if your food isn’t sweet, salty or sour, then heating it up 220F only kills off some of the wee beasties, leaving the hearty high-temperature beasties to thrive in your foods. This is how you kill people with botulism… Foods that aren’t sweet, salty or acidic, like vegetables and meats, don’t have a second method for retarding spoilage, so you have to get the food REALLY REALLY hot to kill off the wee beasties. The only way to get stuff in jars hotter than 220F is through increasing the pressure – hence the third method of canning is pressure canning. Because of the amount of heat and pressure necessary, low-acid vegetables like beans (green or shelled), potatoes, corn, peas, mushrooms, and all meats, eggs or fish MUST be pressure canned to kill off the wee beasties. A pressure canner is a special pot with a tight lid, an air-tight seal and a valve or weight to adjust the pressure.
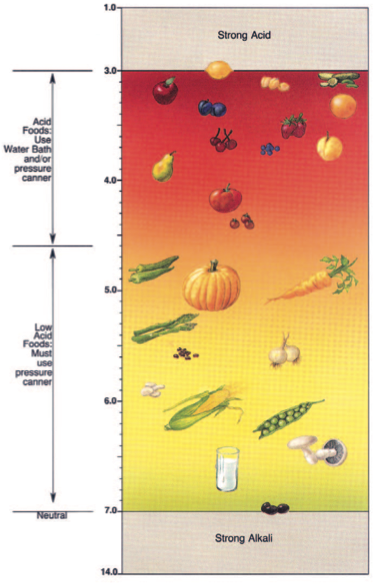
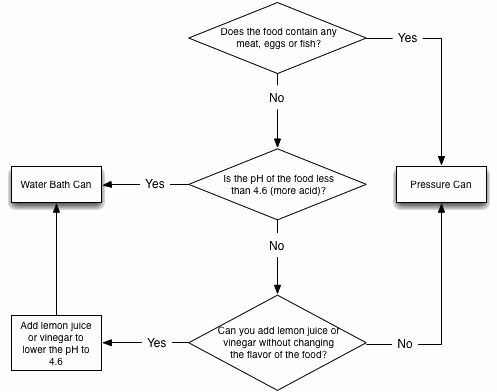
Water Bath or Pressure Can? Technically, any food will be sterilized using pressure canning. But with sweet, salty or acidic foods, pressure canning is overkill. The amount of heat and pressure applied to the food to get it sterile will break down tender fruits, turn pickles into mush, and make jams hard and unspreadable. If your food is really sweet, salty or acidic, then water bath can it – it’s gentler on the food. There are some foods that are marginal in their sweetness, saltyness or acidity. For example, tomatoes are acidic, so whole tomatoes can be water bath canned, but when you cook tomatoes (heat reduces acid) with onions (low acid), and bell peppers (low acid) to make tomato sauce, you may reduce the acid enough to require pressure canning. Some fruits are acidic when unripe and less acidic (more sweet) when ripe (e.g. apples, pears) so the ripeness of the fruit may necessitate pressure canning. The solution is to test the acidity using pH strips or a pH meter and either add lemon juice or vinegar to bring the acid up and water bath can, or to pressure can the low-acidity food. According to the USDA Complete Guide to Home Canning, (Guide 01, page 4) the cutoff point is 4.6 pH. Lower than that (more acidic) and your food is fine to water-bath can. More than that (less acidic) then your food must be pressure canned. (Note most foods fall into the range of 3.0 to 7.0 pH, and few foods are alkali or basic and have pH between 7.0 and 14.0.) Additionally, any food with meat, regardless of how acidic, MUST be pressure canned. So, if you add italian sausage to your tomato sauce, it MUST be pressure canned.
In summary, avoid steam canning unless you have specific recipes that are tested using a steam canner. Follow the flowchart to determine if you water bath or pressure can the food.
You didn’t know that? Yeah, neither did I, until I had the squeakyness explained…
Thanks to Joe Dobosy and Mich Minoura for explaining squeaky cheese curds, to Hook’s Creamery for jalapino cheese curds, and to Carl Geissbuhler of Brunkow Cheese for explaining why cheese curds are squeaky.
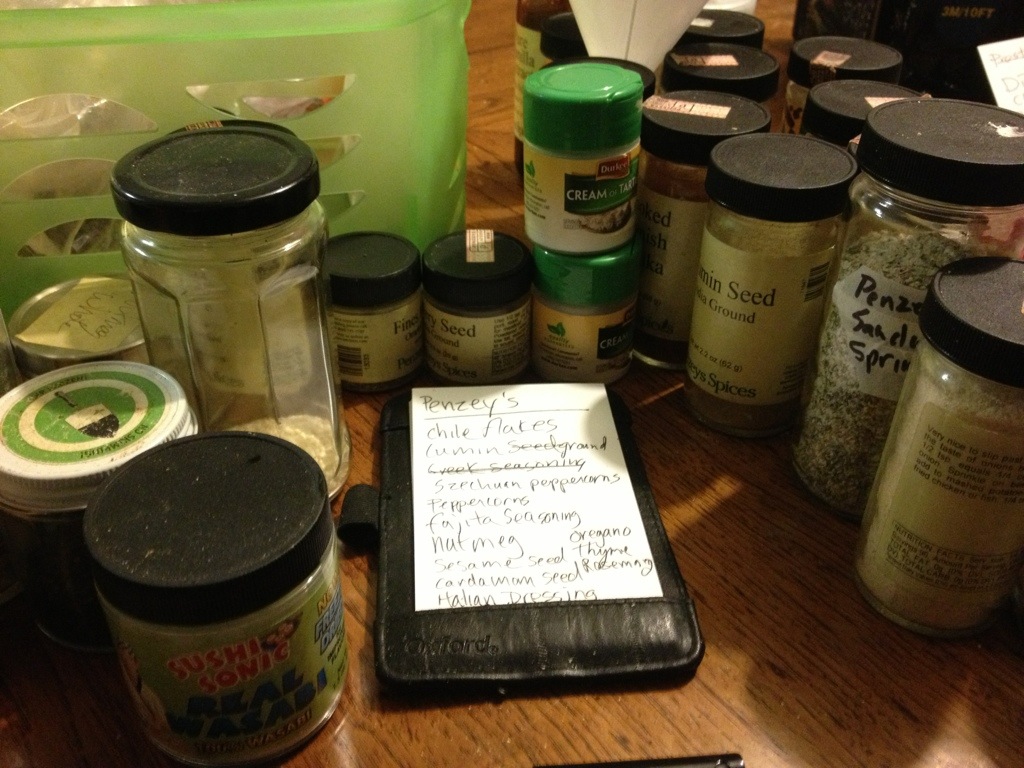
I’m looking forward to going to Penzey’s spices while we’re back home in Madison. We’ve run out of awful lot of things and had to buy subpar quality spices from the co-op. They try to keep good spices in stock, but there’s only so much turnover on things like ground cardamom or whole nutmegs.
So I need to address the obvious – What is a locavore? The most boilerplate comes from the very first post of this blog – The dictionary definition, “A person whose diet consists only or principally of locally grown or produced food.” There’s two problems I have with this definition. First, it frames locavore as a “diet” and second, the definition leaves “local” to be defined elsewhere. Please excuse me as I pick at nits.
I don’t like diets – in the modern use of the word as a set of guidelines on choosing food, not in the Anthropological meaning of the word as anything that people eat. Diets come as arbitrary sets of rules or guidelines that ossify eating practices and attempt to define the world into “good” and “bad” foods. Lard? Bad. Broccoli? Good. Locally-raised pig lard? Bad (unless you’re a locavore, then it’s good). Conventionally farmed broccoli from Argentina available in New Hampshire in February? Good (unless you’re a locavore, then it’s bad…) I really do NOT want anyone to think there is some list of goods and bads making up the Locavore diet and that you may only eat things on the good list and nothing off the bad list. Diet also emphasizes choosing foods and avoiding foods – a universe of possibility that neglects what you do with the foods you choose or what happens to the foods you avoid. I want locavore to mean more than just choosing foods that are good and avoiding foods that are bad because locavore is more than just the food – it’s about preserving food, cooking food and enjoying food too…
Second, the dictionary leaves out what “local” means. The dictionary defines “local” as “belonging or relating to a particular area or neighborhood, typically exclusively so.” Local as geography. So each locavore is a pin on a map with a circle around it. I don’t much like that either. We can use other definitions of “local” to broaden our understanding of food. I think of food using a network definition. Imagine a network of food producers, packagers, distributors and consumers. Each person or organization is a node and is linked by the transactions between nodes. We all eat within this type of network-I buy a can of tomatoes sold at the coop, shipped by a grocery wholesaler, packages by a plant, picked by a person, grown by a farmer. Alternatively I go to my pantry and get a jar of home-canned tomatoes that I bought at a farm stand that were picked by the farmer. Local, to me, means both geography AND relationship networks. How can we act to minimize both distance and connections?
So, I’m being pedantic, but I want to explore these ideas more fully in this blog… This is why I started in the first place. To gain a better understanding of how and why I eat locally.
So back to my original question: What is a locavore? The dictionary says, “A person whose diet consists only or principally of locally grown or produced food.” Let’s modify this…
A locavore is person who acquires, preserves, cooks and eats food in order to minimize the distance between the food production and consumption.
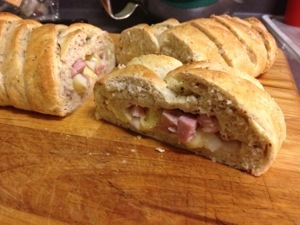
My mom used to make this sandwich when we were kids, but I think she must have filled it with rutabagas, turnips, and lindberger cheese, because I never really liked it as a kid. However, this recipe is GREAT for grownups, especially grownups who would like to put together something showy to take to a potluck. Mom’s recipe came from some Fleishmann’s cookbook or advertisement – the recipe, as she wrote it, calls for Fleishmann’s yeast by name. I made it with a rough-ground mustard so my dough was speckled with mustard seeds.
I hope that I can use the technology of the internet to help show you how to make this sandwich. I took some in-progress pictures, plus I made a hastly drawn diagram on Penultimate on my iPad. If you don’t get it, I’ll make this again and post a video to Youtube.
(Smother’s Leftover Makeovers, p29.)
4 cups (560g) AP Flour
2 Tbsp sugar
1/2 tsp salt
1 cup water
1/4 cup dijon mustard
2 Tbsp butter
2 packages (14g) rapid rise yeast
1.5 cups cubed ham (1 cm/ 1/4 inch cubes)
1 cup cubed apple
1 cup cubed cheese (I used cow’s milk cheese from Cobb Hill Farms)
Mix flour and salt. Reserve 1 cup flour/salt mix.
Mix water, mustard, sugar and butter in a glass measure cup. Microwave until butter is melted and temperature reaches 125 to 130F.
Add flour to bowl of the stand mixer with the paddle attachment. Drizzle in the liquid until a wet dough forms. Switch to the dough hook. Knead for 4 minutes, adding in the additional 1 cup of flour/salt to reach a firm dough. Let the dough rest for 10 minutes so the glutein relaxes.
Heat the oven to 375F.
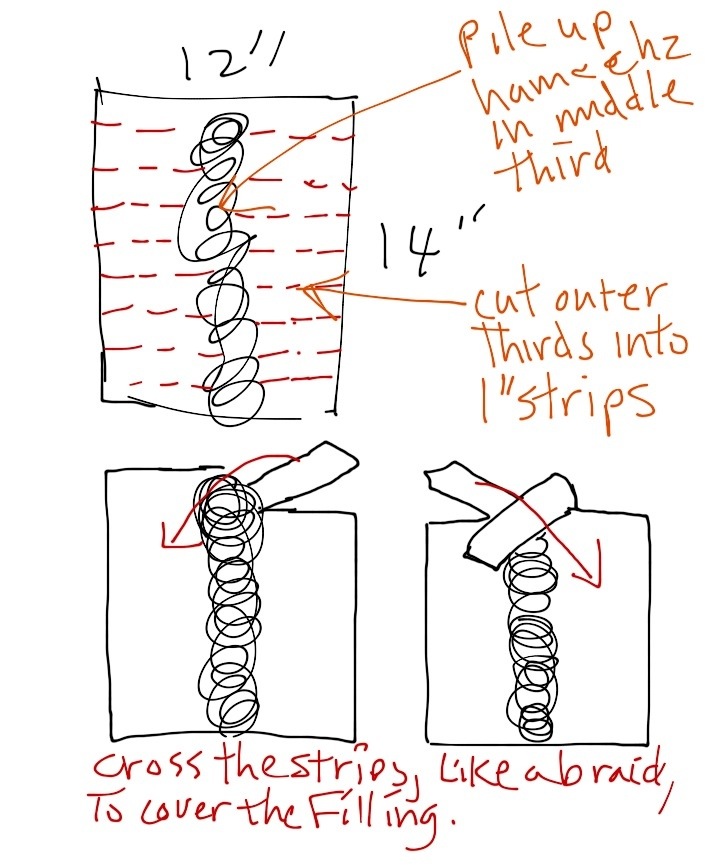
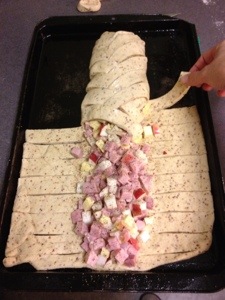
Reserve a golf-ball sized piece of dough. Roll the remaining dough out to a 14″x12″ rectangle. Transfer the dough to an oiled baking sheet. Pile the cubed meat, apple and fruit along the middle third of the dough. Cut the outer thirds of the dough into 1″ strips. Fold the strips over to cover the filling, like making a braid. Roll the golf-ball sized piece of dough into a disk, and use it to “plug” the sandwich on the end where you started braiding – the filling won’t fall out this way.
Put the sandwich someplace warm and let the dough rise for 15 to 20 minutes. Brush the sandwich with a beaten egg, making sure to cover the edges and any dough peeking through the braid.
Bake the sandwich in the middle of the oven for 25-35 minutes, rotating halfway.
Let the sandwich sit for 10 minutes to let the cheese firm up before slicing. Serve warm.
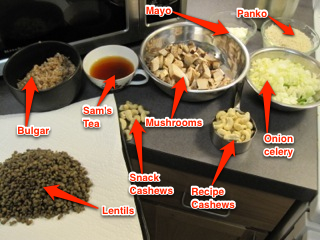
Mise En Place… with a bit of tea and snacking along… Annotations made with Skitch.
EDIT: There’s pictures now… Now I can only apologize for the lack of a final picture of a cooked burger.
So, I’ve found there’s two types of “mushroom burger” – the first is a portobello cap between a bun – a grilled mushroom cap sandwich, as it were. The other is macerated mushrooms with other stuff, made into a patty, and eaten between a bun. This recipe the latter type. But, since it’s a Cooks Illustrated recipe (yet again!) there’s a LOT more to it.
Disclaimer: I didn’t do much of the cooking tonight. Sam had the day off, so he did 95% of the cooking. My contributions were: microwaving frozen peas, opening a can of corn, microwaving said corn, and toasting burger buns. So much of this post is based on Sam’s narrative of making of mushroom burgers.
As an aside, all Cooks Illustrated recipes are sometimes more complex than they need to be… This is the extra work the writers at Cooks put into developing recipes that are reliable, not simple. Cooks is NOT concerned with novice chefs that can’t read a recipe. They expect you to know your way around your well-equipped kitchen. That being said, all of the reliability of their recipes comes with a trade off. Sometimes the steps seem completely unnecessary and pointless. (note my discussion about rehydrating porcini mushrooms from Tuesday) But, when I’m cooking one of their recipes, I follow their instructions religiously.
Onto the mushroom burgers (So says Sam)… Sam doesn’t think this recipe made a “mushroom burger,” just a really good “veggie burger.” There wasn’t enough mushroomyness for him. In the recipe, the mushrooms were only one of four main components. The recipe called for lentils, bulgur wheat, and pakno breadcrumbs, with mayonnaise to bind it together. So the overall impression was not “mushrooms” it was “patty of stuff.” We brainstormed how to make the whole thing more “mushroomy” and the only good idea we could come up with was to use dried shiitake mushrooms ground to a powder as a binder and a way to absorb more moisture. I also though about a “stuffed mushroom burger” where a portobello cap was grilled, then stuffed with mushroom filling and finished under indirect heat, and served on a bun. It would be a hybrid of the mushroom cap sandwich and the veggie burger.
So they’re a time-consuming but tasty substitute to Gardenburgers. We’ll have to do some tests to see how well the formed patties can freeze. Having these on hand in the freezer would make me more likely to cook them again. I’ve come to expect veggie burgers to be a quick dinner, not a 45-minute prep that required the food processor.
Sorry for the lack of pictures – I didn’t take any since I wasn’t cooking. There’s a few pictures hiding on the actual digital camera (I take all my photos on my iPhone), but I don’t know how to get to them…
We’re a bit short on cooking utensils while staying at the hotel waiting to move into our new apartment. I figured I should try out some new things with our rice cooker. Sam noticed lots of local collard greens at the Norwich farmers’ market, and suggested we eat beans and greens one night for dinner.
Beans and greens is good old-fashioned comfort food. Typically we cook it all day in the crock pot, but the rice cooker can act like a glorified crock pot, boiling the beans, then holding warm until its time to eat.
I soaked 1 cup of black navy beans from the COOP overnight in water. In the morning before Pidi and I went on a long hike, I assembled the following in the rice cooker:
Soaked beans, drained and rinsed
4 cloves garlic, crushed
1/4 large onion, chopped
1 large bunch (8 stalks?) of tuscan kale, stemmed and chopped
salt
3 cups of water
I put the rice cooker on the setting for cooking brown rice and hit the start button. When we got back from our hike in Boston LotBluffs (just across the street!), we had made the whole hotel smell great. I gave the pot a stir and left it to stay warm.
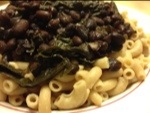
When it came time for dinner, we served the beans and greens with elbow macaroni. It was a little plain and we added sriracha for some more flavor. I would have loved some ham or bacon grease to give it a little more flavor. Or, I could have cooked with stock or beer.

 A water bath canner with a rack to hold jars.
 A pressure canner with a gauge to tell the inside pressure.