Friends, I have been way behind in relating some important news in the 2019 ReLocavore season.
First, I am sure many of you know, but if you don’t, ReLocavore and The Mister relocated. We are now back in our native turf, Southern Wisconsin. Back with quality farm land, quality farmers and quality markets. So, we re-re-located. You’ll see a definite shift in my work. First, I have lots of built-in helpers. Second, my new house has white composite marble countertops (goodbye beautiful New Hampshire granite).
Second, I have not been posting the canning inventory for 2019. Let me catch you up…
37 pints Strawberry Jam (h/t Smother and The Mister)
8 quarts frozen strawberry halves
9 pints blueberry jam (h/t The Mister for getting them from Tree Ripe Fruit Co)
Even given my kvetching, Sandor Katz fermenting workshop had a strong influence on me. I guess I may be developing my skills as an amature fermento. I have now fermented:
The Kimchi is clearly my biggest fermentation success. Yummy yum. I think I got the balance of spice and saltiness, and since we had the space to let the stink dissipate, I was able to let it ferment for a month and get very sour. Next time – more ginger, for sure. I have enjoyed eating my kimchi on pizza. The flavors of kimchi are very similar to the flavors of pepperoni and pepperoncini: hot, tangy, and salty. In fact, some pepperoni are actually fermented by being inoculated with flavor-enhancing molds!
Mixed vegetable kraut we made at the Katz workshop. It’s shredded carrots, radishes, white turnips and onions. I have let it sit for a few weeks and flavors have mellowed and gotten more sour. The onion smell was initially very strong – I was slightly worried I would get a charge on my hotel bill for cleaning out the stank. But over a few weeks the onion smell has become milder and richer with more umami. We have been eating it all along the fermenting time and I think it gets better every time I eat some.
Blueberry Soda was demoed at the workshop, so after picking blueberries, I used some to make my own soda. I used about 1/2 cup of sugar, a pint of blueberries and about a quart of water. I mixed it together without crushing the berries and kept stirring over 4 days. The final product went into a growler and has been hanging in the fridge. It’s a light pink color with a mild effervescence, kind of like kombucha. It’s OK, but I wouldn’t want to drink a lot. I’m not a big fan of sweet drinks, but it would be a good mixer.
I found an accidental glut of cucumbers in the garden last week and decided to try to make half-sour pickles. The cukes were too big for whole pickles, so I cut them into spears. Whole cucumbers will ferment for weeks or months and still stay slightly crisp, but fermenting cucumber spears will inevitably lead to mushy pickles after a week or so. I decided to make half-sour pickles, which are in a stronger brine and fermented for a short period. Into big quart jars I added two crushed garlic cloves, a big sprig of fresh dill, and a 3% salt brine – about two tablespoons of salt for a quart of water. They hung out on the kitchen counter for 4 days. They came out crisp, yet salty and a little tangy. Sam seems to be a big fan of them.
Sam and I have a love for Japanese food. I don’t quite know where it all came from, but we’ve incorporated a lot of key Japanese foods into our diet, and we are always exploring new Japanese dishes. Warning flag… This is NOT a post about local foods. This is actually a post about the least local thing we eat… Nonperishables imported from Japan. Claims of locavore hypocrisy are welcome in the comments!
1. Yamasa soy sauce. 2. Kombu, dried kelp used in making dashi stock. 3. Hiyashi chuka noodles: Sesame vinegar dressing with hot mustard. 4. Brown sushi rice. 5. Hon mirin. Not the shitty corn syrup stuff. 6. Fried tofu pockets for making inarizushi. 7. eggplant pickles (the only way I will eat eggplant). 8. More noodles. 9. Cucumber pickles. Totally unlike all American Kosher Dills. 10. Tonkatsu sauce. 11. Takuan, pickled daikon radish. 12. Ripping hot spicy mustard. 13. Salmon Furikake. It’s a mix of sesame, nori (seaweed sheets), and dehydrated salmon that you shake on top of rice or tofu. 14. A foam skimmer. It’s a joke. I’ll explain later. 15. Yamaimo or slippery potato or mountain yam. 16. Botan rice candy. 17. Ume plums. Pickled apricots with a minty herb called shiso. 18. Beni Shoga, or pickled ginger. Unlike the stuff at sushi bars, this has no added sweetener and is a little salty. 19. Fish cake. This is pollack that is died and pressed into shapes. I serve it in noodle dishes. 20. More noodles, but this kind is fresh instead of dried. 21. Kouya dofu, or freeze-dried tofu. I’ll use it to make mochi nuggets, like vegan chicken nuggets. 22. More fish cake, but this time extruded into a log with a pink spiral shape.
We visited two different Asian groceries: Ebisuya Japanese Market in Medford, MA.
65 Riverside Ave Medford, MA 02155
781-391-0012
info@ebisuyamarket.com
This was a Japanese-only grocery store and where we bought about 90% of our pantry staples. They had some fresh foods, but mostly shelf-stable foods. They were operating a busy fish counter and had a sushi bar attached to the grocery. The whole store was the size of a big convenience mart. I was very impressed with the selection of foods at Ebisuya. Someone with a great love of Japanese food is making sure the Japanese of Boston metro area have access to fine-quality imported foods. They even had fresh green ume plums!
H Mart
43 Middlesex Turnpike, Burlington, MA 01803
781-221-4570
H Mart is the Big Box asian grocery. Frankly, it was very intimidating to be there on a Sunday afternoon – the whole store was PACKED with customers. There was a wait for parking. H Mart is mostly Korean goods, but they carry a lot of Japanese foods as well, due to the overlap between the cuisines. We only picked up a few items there because Sam and I were both completely overwhelmed by the size and business of the store. We’ll try to go back midweek and midday and hopefully it’s not so crazy. I think we could find everything we wanted there, and the prices were about comparable to Ebisuya. H Mart does have a large produce section, if we’re wanting produce for whatever reason.
Over the next few weeks, I’ll be posting some videos and explanations of how I use a lot of these foods in my cooking.
A steam canner. A water bath canner with a rack to hold jars. A pressure canner with a gauge to tell the inside pressure.
Canning is the process of sterilizing and sealing food into air-tight glass jars. Canned goods can last for years at room temperature as long as the seal is intact. Foods that have been canned can retain most of the nutrients and flavors of the fresh food, and, for some foods, canning actually helps release nutrients and flavors that aren’t present in the raw food. I’m going to explain differences among the three types of canning to help you decide when to use each method.
The whole point of canning is to heat up food to kill off any wee beasties that might spoil the food. The most concerning wee beastie is Clostridium botulinum which produces botulism toxin, a powerful neurotoxin. C. botulinum mostly hangs around in a spore form which can only be killed with heat over 240F, but can start metabolizing and producing the toxin in low-acid environments. Additionally, heating up the food also heats up the air in the jar, and as the jar cools, the rubber seal helps form a negative pressure space that seals the lid onto the jar.
There’s three types of canning: steam, water and pressure. Each method has a different way to heat up the contents of the jars and kill off wee beasties.
Steam canning uses a little bit of water which is vigorously boiled to envelope the jars in hot steam to raise the temperature of the jar contents. I personally don’t use a steam canner. I realize that the thermo-conductive potential of hot gas is the same as hot liquid, but something about it gives me the willies… I can’t believe that a hot gas is enough to sterilize my food. Additionally, most canning books that I have tested their recipes in water bath or pressure canners. And, by “testing” recipes, I’m not talking about tasting only for flavor, but also to ensure the food is sterile and sealed. Untested recipes could mean unsealed jars or not sterile foods. I’m not willing to take the risk of converting recipes to steam canning from other canning methods.
Water bath canning uses boiling water at 220F (or thereabouts, depending on your altitude) to sterilize the jar contents. However, some wee beasties still thrive at temperatures above 220F, but, lucky for us, they can’t survive in acidic, sweet or salty environments. So, if a food is sweet, salty or sour (e.g. jams, pickles, naturally acidic fruit) then you only have to heat it up to 220 to kill off most of the wee beasties, then the sweet, salt or acid keeps the other beasties from metabolizing and spoiling your food. A water bath canner is nothing fancy, just a deep pot with a lid.
Unfortunately, if your food isn’t sweet, salty or sour, then heating it up 220F only kills off some of the wee beasties, leaving the hearty high-temperature beasties to thrive in your foods. This is how you kill people with botulism… Foods that aren’t sweet, salty or acidic, like vegetables and meats, don’t have a second method for retarding spoilage, so you have to get the food REALLY REALLY hot to kill off the wee beasties. The only way to get stuff in jars hotter than 220F is through increasing the pressure – hence the third method of canning is pressure canning. Because of the amount of heat and pressure necessary, low-acid vegetables like beans (green or shelled), potatoes, corn, peas, mushrooms, and all meats, eggs or fish MUST be pressure canned to kill off the wee beasties. A pressure canner is a special pot with a tight lid, an air-tight seal and a valve or weight to adjust the pressure.
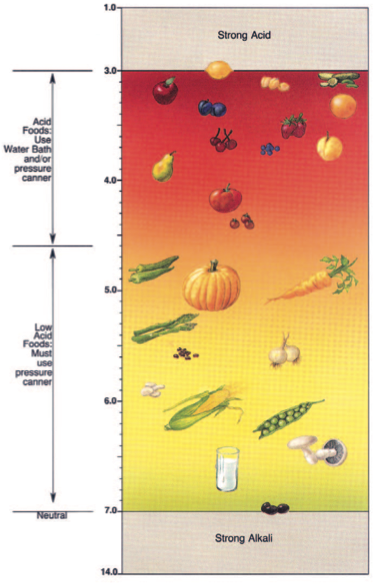
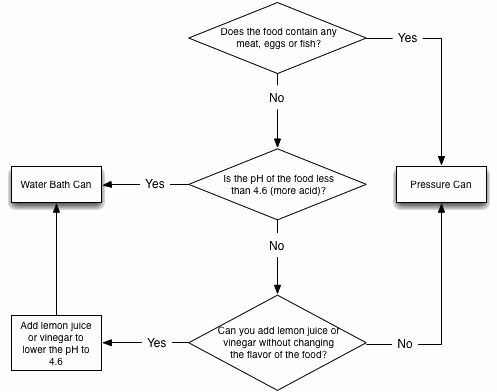
Water Bath or Pressure Can? Technically, any food will be sterilized using pressure canning. But with sweet, salty or acidic foods, pressure canning is overkill. The amount of heat and pressure applied to the food to get it sterile will break down tender fruits, turn pickles into mush, and make jams hard and unspreadable. If your food is really sweet, salty or acidic, then water bath can it – it’s gentler on the food. There are some foods that are marginal in their sweetness, saltyness or acidity. For example, tomatoes are acidic, so whole tomatoes can be water bath canned, but when you cook tomatoes (heat reduces acid) with onions (low acid), and bell peppers (low acid) to make tomato sauce, you may reduce the acid enough to require pressure canning. Some fruits are acidic when unripe and less acidic (more sweet) when ripe (e.g. apples, pears) so the ripeness of the fruit may necessitate pressure canning. The solution is to test the acidity using pH strips or a pH meter and either add lemon juice or vinegar to bring the acid up and water bath can, or to pressure can the low-acidity food. According to the USDA Complete Guide to Home Canning, (Guide 01, page 4) the cutoff point is 4.6 pH. Lower than that (more acidic) and your food is fine to water-bath can. More than that (less acidic) then your food must be pressure canned. (Note most foods fall into the range of 3.0 to 7.0 pH, and few foods are alkali or basic and have pH between 7.0 and 14.0.) Additionally, any food with meat, regardless of how acidic, MUST be pressure canned. So, if you add italian sausage to your tomato sauce, it MUST be pressure canned.
In summary, avoid steam canning unless you have specific recipes that are tested using a steam canner. Follow the flowchart to determine if you water bath or pressure can the food.
I like to pickle – to preserve vegetables in a salt and vinegar brine. I pickle for three reasons: First, it’s a way to preserve some veg to eat later in the season. Second, I have a bad salt-sour tooth (like a sweet tooth, but more for salty and sour things). Third, my pickles never turn out the same way twice, so it’s always a surprise when I open a jar.
Sidenote: pickling is not fermenting… They’re different processes. Pickling is killing microbes and reducing their ability to reproduce by introducing a hot, salty and acidic environment. Fermenting is using the microbes to create a warm and slightly acidic environment that both slows reproduction and breaks down foodstuffs. Some old-school cucumber pickles are both fermented and pickles, but not all.
Another sidenote: Pickling can produce both self-stable pickles and pickles that need refrigeration to keep from spoiling-so-called “refrigerator pickles.” I prefer refrigerator pickles because they’re very easy to make and the resulting veg stays crisp.
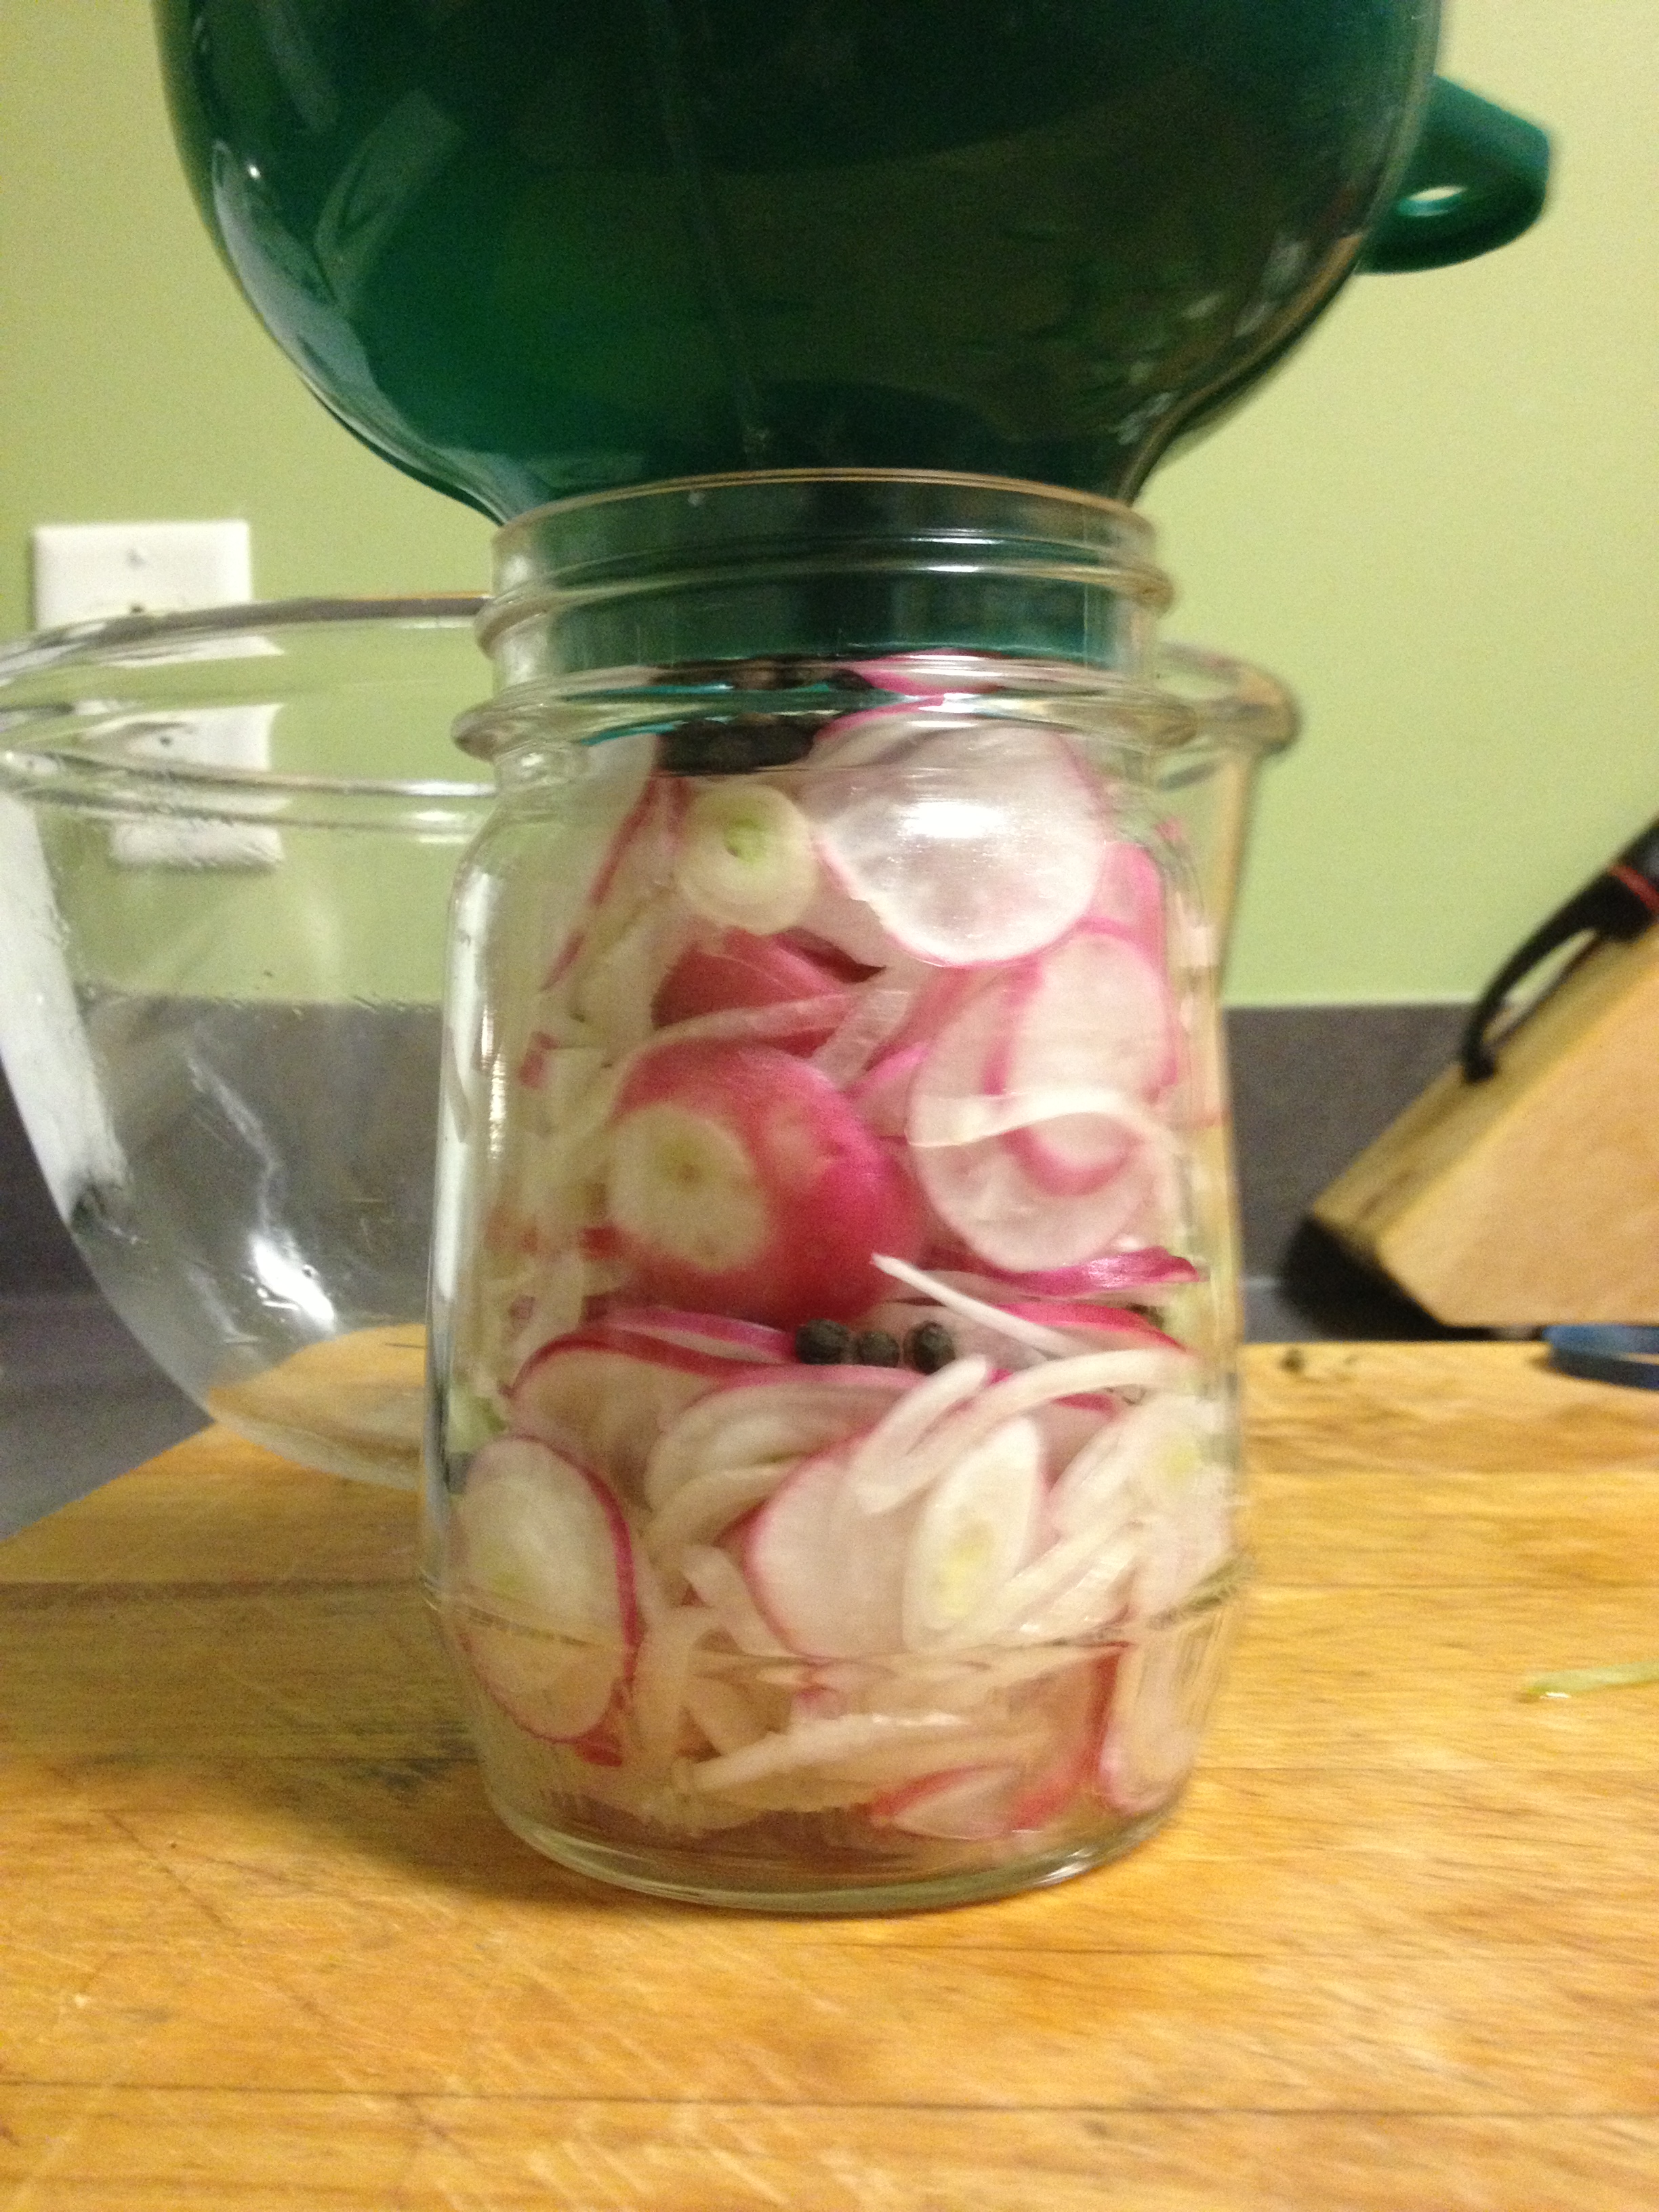
To start out this season, I made pepper pickled radishes. These are radishes pickled in a vinegar-salt-sugar brine with peppercorns. They turn a light shade of pink as the color leaches out of the radish into the brine. For a new twist this year, I added a sliced onion. In retrospect, I used too much onion, so these are more pepper pickled onions with some radishes thrown into give it a pink color. As they hang out in the fridge, the pepper flavor gets stronger while the vinegar mellows.
Pepper Pickled Radishes
(Makes 1 pint of radishes. All measurements are approximate… This is the variability I talked about…)
8 radishes – about 1″ in diameter
1 small onion
1 tbsp peppercorns
1 cup rice wine vinegar, apple cider vinegar or white vinegar
6 tbsp salt
2 tbsp sugar
Heat the vinegar, salt and sugar to almost boiling. Taste it and adjust salt and sugar to your preference.
Thinly slice the radishes and the onion on the mandoline.
In a pot of boiling water, sterilize a clean canning jar, ring and lid for 10 minutes.
Fill the sterile, hot jar with layers of radish slices, onion slices and peppercorns. Press firmly to pack the jar very tight. Pour over the hot brine until within 1/2″ of the rim of the jar. Tap the jar firmly on the counter to release air bubbles. If air bubbles are still visible, jam a butter knife down the veg to release the air bubbles. Press down any veg sticking up out of the jar, so it won’t touch the jar lid. Top off the jar with extra brine to reach within 1/4″ of the rim of the jar. Wipe the lip of the jar clean, top with the lid and screw on the ring to hand-tight.
Put the jar in the way back of the fridge. Let cool for at least 24 hours.


 A water bath canner with a rack to hold jars.
 A pressure canner with a gauge to tell the inside pressure.