ReLocavore: Redefining "local"

Back to Wisconsin, my cheesehead friends


3 Comments

Canning 101: The three types of canning

A steam canner.
A water bath canner with a rack to hold jars.
A pressure canner with a gauge to tell the inside pressure.

Canning is the process of sterilizing and sealing food into air-tight glass jars. Canned goods can last for years at room temperature as long as the seal is intact. Foods that have been canned can retain most of the nutrients and flavors of the fresh food, and, for some foods, canning actually helps release nutrients and flavors that aren’t present in the raw food. I’m going to explain differences among the three types of canning to help you decide when to use each method.

The whole point of canning is to heat up food to kill off any wee beasties that might spoil the food. The most concerning wee beastie is Clostridium botulinum which produces botulism toxin, a powerful neurotoxin. C. botulinum mostly hangs around in a spore form which can only be killed with heat over 240F, but can start metabolizing and producing the toxin in low-acid environments.  Additionally, heating up the food also heats up the air in the jar, and as the jar cools, the rubber seal helps form a negative pressure space that seals the lid onto the jar.

There’s three types of canning: steam, water and pressure. Each method has a different way to heat up the contents of the jars and kill off wee beasties.

Steam canning uses a little bit of water which is vigorously boiled to envelope the jars in hot steam to raise the temperature of the jar contents. I personally don’t use a steam canner. I realize that the thermo-conductive potential of hot gas is the same as hot liquid, but something about it gives me the willies… I can’t believe that a hot gas is enough to sterilize my food. Additionally, most canning books that I have tested their recipes in water bath or pressure canners. And, by “testing” recipes, I’m not talking about tasting only for flavor, but also to ensure the food is sterile and sealed. Untested recipes could mean unsealed jars or not sterile foods. I’m not willing to take the risk of converting recipes to steam canning from other canning methods.

Water bath canning uses boiling water at 220F (or thereabouts, depending on your altitude) to sterilize the jar contents. However, some wee beasties still thrive at temperatures above 220F, but, lucky for us, they can’t survive in acidic, sweet or salty environments. So, if a food is sweet, salty or sour (e.g. jams, pickles, naturally acidic fruit) then you only have to heat it up to 220 to kill off most of the wee beasties, then the sweet, salt or acid keeps the other beasties from metabolizing and spoiling your food. A water bath canner is nothing fancy, just a deep pot with a lid.

Unfortunately, if your food isn’t sweet, salty or sour, then heating it up 220F only kills off some of the wee beasties, leaving the hearty high-temperature beasties to thrive in your foods. This is how you kill people with botulism… Foods that aren’t sweet, salty or acidic, like vegetables and meats, don’t have a second method for retarding spoilage, so you have to get the food REALLY REALLY hot to kill off the wee beasties. The only way to get stuff in jars hotter than 220F is through increasing the pressure – hence the third method of canning is pressure canning. Because of the amount of heat and pressure necessary,  low-acid vegetables like beans (green or shelled), potatoes, corn, peas, mushrooms, and all meats, eggs or fish MUST be pressure canned to kill off the wee beasties. A pressure canner is a special pot with a tight lid, an air-tight seal and a valve or weight to adjust the pressure.

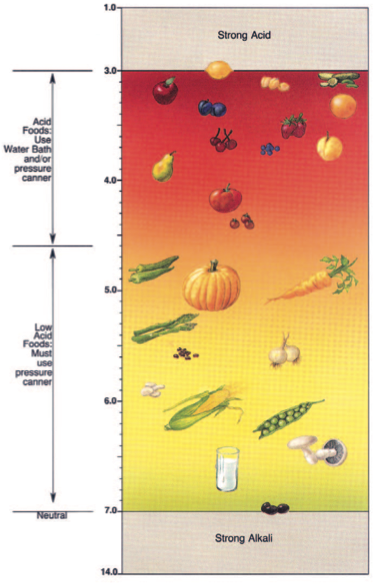
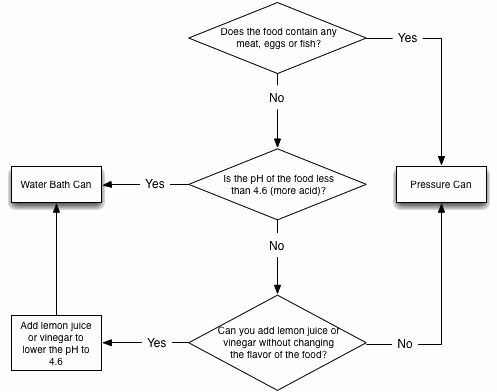
Water Bath or Pressure Can? Technically, any food will be sterilized using pressure canning. But with sweet, salty or acidic foods, pressure canning is overkill. The amount of heat and pressure applied to the food to get it sterile will break down tender fruits, turn pickles into mush, and make jams hard and unspreadable. If your food is really sweet, salty or acidic, then water bath can it – it’s gentler on the food. There are some foods that are marginal in their sweetness, saltyness or acidity. For example, tomatoes are acidic, so whole tomatoes can be water bath canned, but when you cook tomatoes (heat reduces acid) with onions (low acid), and bell peppers (low acid) to make tomato sauce, you may reduce the acid enough to require pressure canning. Some fruits are acidic when unripe and less acidic (more sweet) when ripe (e.g. apples, pears) so the ripeness of the fruit may necessitate pressure canning. The solution is to test the acidity using pH strips or a pH meter and either add lemon juice or vinegar to bring the acid up and water bath can, or to pressure can the low-acidity food. According to the USDA Complete Guide to Home Canning, (Guide 01, page 4) the cutoff point is 4.6 pH. Lower than that (more acidic) and your food is fine to water-bath can. More than that (less acidic) then your food must be pressure canned. (Note most foods fall into the range of 3.0 to 7.0 pH, and few foods are alkali or basic and have pH between 7.0 and 14.0.) Additionally, any food with meat, regardless of how acidic, MUST be pressure canned. So, if you add italian sausage to your tomato sauce, it MUST be pressure canned.

In summary, avoid steam canning unless you have specific recipes that are tested using a steam canner. Follow the flowchart to determine if you water bath or pressure can the food.

CanningFlowChart


3 Comments

I said 9 dozen, not 9 ears…

The guy at the farmer’s market did a double-take when I asked him for 9 dozen ears of corn. He though I had asked for 9 ears of corn. And at $6-9 PER DOZEN I was rethinking my decision and checking the amount of cash I had in my wallet for this venture. The prices were the same inflated, yuppie-priced, markup flimflam that I’ve come to expect at our farmer’s market. I’m used to paying Wisconsin Fertile Farmland prices of $1-2 per dozen ears – and typically getting a baker’s dozen (13) for that price. No wonder some people believe that eating locally is financially unachievable for everybody. He was the lowest price at the market at $6/doz, but I talked the guy down to $5/doz… Still too pricy…

I’m not much of a fan of canned corn – I’d much rather have it frozen. I tried canned corn a few years back and the end product turned starchy and mushy. It was more like creamed corn than canned. Plus, frozen corn turns into 6″ x 6″ x 1″ building blocks that we use to make dividers in our chest freezer. We can keep the layers more distinct and keep the fruits and vegetables separate.

I follow the process that my mom taught me a few years back:

Husk the corn.

1.

Husk the corn. Tip: Husk the corn outside. Neither mops nor vacuum cleaners are good at picking up corn silks.

 Wash the corn and cut off any bad spots.

2.

Wash the corn and cut off any bad spots.

Cut the kernels from the cob.

3.

I prefer to cut the kernels from the cob rather than using any of those special corn cutters. I find a sharp knife makes the least amount of mess and splatter. Corn cutters aren’t usually as sharp and spray kernels everywhere. Plus, if you have a cob that is curved, corn cutters won’t work at all. Cut the kernels from the cob. Tip: Find a bowl with a footed base – a deep lip on the bottom of the bowl used to keep the bowl upright. Turn the footed bowl upside down in your Big Damn Bowl and use the foot to hold onto the ear of corn while you cut. It stablilzes the bottom of the ear of corn allowing you to cut all the way down to the bottom of the ear of corn without hitting the bottom of the bowl.

Saute the kernels with butter.

4.

In a nonstick skillet, saute 1 tbsp of butter with 2 cups of kernels on medium-high heat for about 3 minutes or until the kernels turn darker yellow and smell really good. Add a big pinch of salt if you’d like. Vegans: use vegetable oil instead of vegan butter spread. I tried it one year with the vegan butter spread and it left a harsh chemical taste in the corn.

5.

After sauteeing the corn, let it cool for a few minutes, so you don’t melt the plastic zipper bags. While you’re waiting for the batch to cool, sautee the next batch and label your plastic zipper bag.

Load into labeled zipper bags.

6.

Load 2 cups of cooked kernels into a plastic zipper bag. Use your bag filler. Spread the kernels evenly through the bag and press out the air.

2013-08-18 11.47.40

7.

Stack the bags into a box or cake pan so they will freeze flat. Freeze.


Leave a comment

Necessary Equipment: A Bag Filler

I have always hesitated to reveal my dark secrets to home preserving. I closely guard the tips and tricks that I use in my kitchen to help me can and preserve food quickly and efficiently. Mostly, I want you all to come to me after the Zombie Apocalypse to preserve the food necessary for the continuation of the human race. If I tell you my tips and tricks, then you may be able to save yourself… But… Give a man a fish, teach a man to fish…

One of the problems with freezing in plastic zipper bags, is that you always fight to keep the bag open while you’re filling it with food. Also, once the bag is full, you have to seal it right away because it has a tendency to tip over and spill. To solve this problem, I use a bag filler –  a rigid plastic tube that holds the bag open while I fill it.

I make my bag fillers from Gatorade bottles. Unlike other plastic bottles, they have ridges so they’re strong around the middle and won’t collapse.

Cut off the top and the bottom, and make sure not to leave sharp edges that could puncture the bag.

2013-08-18 12.35.352013-08-18 12.35.48

The bag filler can go inside the bag or the bag can go inside the bag filler… Either way, the bag stays open and is kept upright and free-standing.

2013-08-18 12.36.592013-08-18 12.36.19


6 Comments

Necessary equipment: a big damn bowl

A big goddamn bowl is essential for successful canning. My mom inherited my big bowl when we moved out to New Hampshire. I had inherited it originally from my mom’s mom… I made it through strawberries without one, but I’m staring down a bushel of green beans and I’m not going to screw around. I NEED a big bowl.

20130812-204449.jpg
To give you a sense, the new big damn bowl is 20-quarts in size. I put a widemouth pint jar in the big damn bowl in order to give you a sense of size. A big damn bowl needs to be large enough in order to successfully wash half a bushel of beans, or hold the kernels cut off a dozen ears of corn, or bathe small infants. Big.

Look for the story of sauerkraut… As made in the big damn bowl.


9 Comments

This Week in Veg: No Lettuce!

So this week marks an important transition between spring and summer. We didn’t get any lettuce in our CSA box this week. We also didn’t get any tomatoes in our CSA box. This is very disappointing. What it means is there’s no period of time when the tomatoes overlap with the lettuce allowing us to eat BLT sandwiches. I love BLTs. There is no sandwich, save a simple sandwich made with tomato and mayonnaise, that even rivals the BLT in my opinion.

I guess I’m going to have to get up tomorrow and go to the farmers market. Buy some tomatoes, and a head of lettuce, so we can eat BLTs at least once this year.

20130809-173901.jpg


Leave a comment

Cucurbit Fruit Salad

Fun Fact!
Both cucumbers and cantaloupes are fruits in the cucurbit family.

Two of my favorite summer vegetables are cucumbers and cantaloupe. They are a fleeting addition to my diet. I tried canning spiced melon balls and they were mushy and disgusting. Each year, I will make one jar of refrigerator cucumber pickles, but I don’t like the texture of home-canned pickles. From July through late August, I probably eat half a cucumber and a few slices of cantaloupe every day. By September, they’re not a part of my diet, and in June, I crave a cucumber on the first hot, sunny day of the summer.

This salad comes together quickly and can get soggy if let to sit. After cutting the fruits (Yes, cucumbers are fruits…), I assemble this salad in a colander set in a bowl, and use some of the juices to toss with a simple dressing.

Cantaloupe Cucumber Salad

  • 1 medium cucumber
  • 1/4 of a cantaloupe or muskmellon
  • pinch of salt
  • 1 tsp rice wine vinegar
  1. Peel and seed the cucumber. Cut into matchsticks or julienne using a mandoline.
  2. Cut away the rind of the muskmelon. Cut into matchsticks or julienne using a mandoline. You should have about equal parts of cantaloupe and cucumber.
  3. Sprinkle the vegetables with a pinch of salt and toss in a colander set over a bowl. Allow to drain 15-20 minutes. Gently squeeze the vegetables to get the last liquid out.
  4. Mix 1 tablespoon of the drained liquid with rice wine vinegar to make a mild dressing. Toss with the vegetables and serve.


Afterthought: All this time, I was misspelling it “cantelope.”


2 Comments

Salsa’s Mexican Restaurant, Springfield, MA

Sam and I stopped on the way back from New York in Springfield, MA to get a bite to eat. Taking my queues from RoadFood.com, we stopped at Salsa’s Mexican Restaurant (yelp) (RoadFood) for a quick lunch.

I am sorry that I didn’t take any pictures of the food we got. I was too busy eating it. I am sorry that you weren’t there to enjoy the food with us because you missed out on a remarkable meal. I’m sorry we don’t all live in Springfield, so we can go eat here regularly and get happy and fat together. The food was just that damn good. It was some of the best cuicina that I have eaten in years… Probably since we stayed at Rancho Leonaro for my little sister’s wedding.

We had papusas of the pork+cheese and bean+cheese variety. They were accompanied by fried plantains, rice, beans and a cole slaw-type salad. This is NOT typical Tex-Mex food. The salad was unlike anything I had ever had – almost like coleslaw made from crema on a bed of lettuce topped with eye-watering fresh hot sauce. The beans were soup-like with lots of cilantro. The rice was well-cooked and medium grain and had a squeeze of lime, but no other flavorings. The fried plantains were made from firm and ripe plantains and weren’t starchy at all. The outsides were caramelized to perfection.

And papusas… Papusas are what quesadillas want to be when they grow up. Or what happens when you run a tamale over with a steamroller. Instead of flour tortillas, papusas are made with thinly rolled masa dough layered with fillings like meat, beans and cheese, and grilled until the middle is melted and the masa dough is cooked. These papusas were perfect. The cheese was both melted into the dough and meat/beans AND had spent just the right amount of time oozing out the sized and onto the griddle to get perfectly brown and crispy. The masa was moist and well-cooked. I’m not a very good food blogger, because I really don’t have the words to convey how terribly wonderful the whole experience was…


What to Do With 50 Pounds of Stone Fruit: A Photo Gallery

2 Comments

We stopped at the Apple Bin Farm Market on the way home from visiting Sam’s grandmother in New York state. They had ripe apricots and peaches. We left with a full carload. So… What can you make from 50 pounds of stone fruit? Click on an image to read more about what me made.

This gallery contains 9 photos