You know, I may frame this and hang it up in my kitchen.

You know, I may frame this and hang it up in my kitchen.
What’s the term for a group of vegetables? We have a herd of cows, a flock of sheep, a murder of crows… but what do you call a bunch of vegetables? A bunch?
Either way, we got a lot of leeks this week in the CSA. I tried to chop and freeze them a few years ago, but I just didn’t get back to using them and they got freezer burn. I think I will put them into a quiche. Sound good. Maybe with bacon?
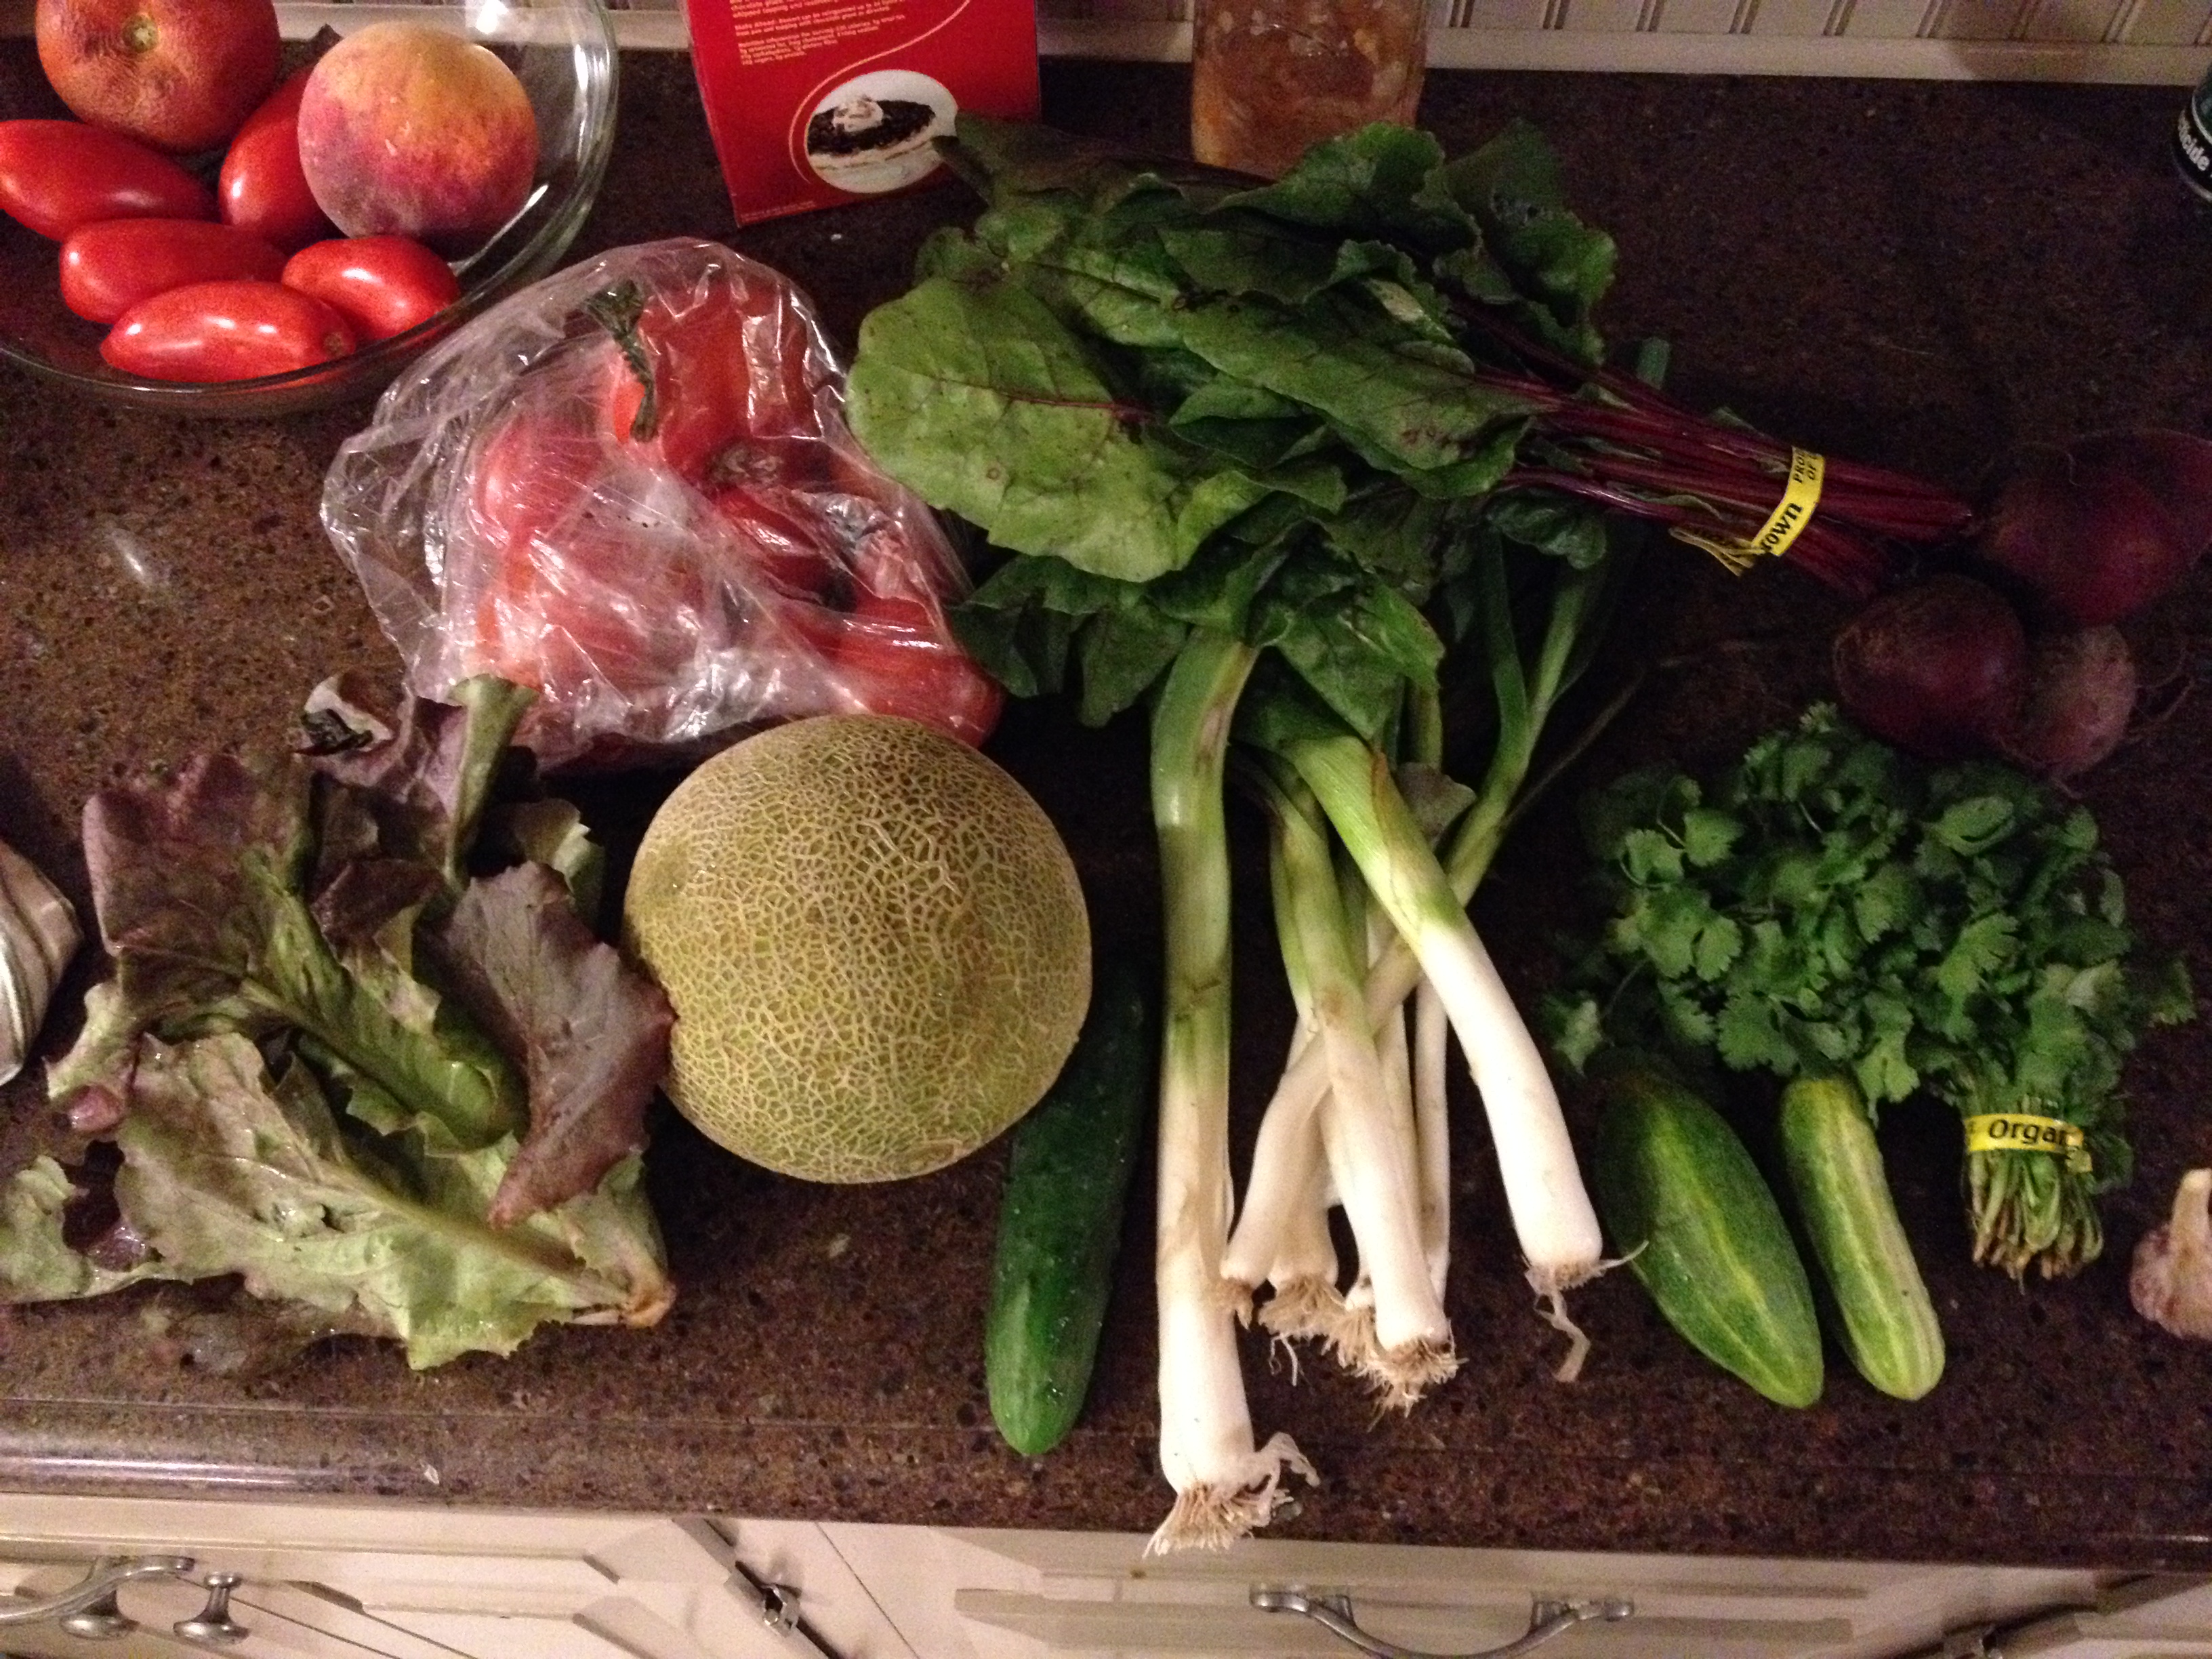
That’s a lot of leeks. A bunch of leeks? A bramble of leeks?
I traveled to Super Acres Blueberry Farm in Lyme, NH with my colleagues from work to pick blueberries. This was my first you-pick blueberry experience. Blueberries are easy to pick because they grow on 5 to 8 foot tall bushes, meaning you get to spend a lot of time in the shade and pick berries standing up. No bending and straining your back for blueberries.
With our berries, I made blueberry jam (3 lbs, 10 half-pints), blueberry buckle (1.5 lbs) and ate the rest with breakfast. I think we may go back again and pick more for the freezer.
Super Acres farm is also dog-friendly, so I can take the pooch with too!


On Jul 22-23 I participated in a Fermenting workshop with Sandor Katz, the author of The Art of Fermentation and Wild Fermentation. Shelburne Farms, just outside Burlington, Vermont hosted the event. If you’ve been to Shelburne Farms before, we were in the Coach Barn for the event. Over two days we covered the basics of fermenting, lactic-acid fermentation of vegetables, a hands-on exercise making our own ferment, (day 2) dairy fermentation, fermenting grains and legumes, and fermented beverages like kombucha.
In general, I was impressed with Mr. Katz knowledge and experience with fermenting. He clearly has a passion for the art and has experimented with a lot of interesting techniques. Admittedly, that was where my enthusiasm stopped. Sorry to drag work into my blog, but I was criticizing Mr. Katz classroom technique throughout the workshop and found his teaching to be lacking. The entire second day was blocked out into 2-hour chunks with 30, 60, and 30 minute breaks between (8 hour day total). Most of the content was basic lecture with a few quick demonstrations (blueberry soda and yogurt). We had a hands-on activity after lunch on day 1, but day 2 was uninterrupted sitting. To compound the fatigue from sitting, the space had uncomfortable chairs and was not air-conditioned. We were pretty short tempered and sweaty in a 90+ degree room with little moving air. I didn’t get much out of the second day, even when I abandoned my uncomfortable chair to stand in the back of the room and hope to catch a little breeze. I did learn a lot, and the course definitely met my objective of motivating me to make better kraut and kimchee. I think I may even start to make our own yogurt.
I had three major takeaways from the event:
| Process 1 | Process 2 | |
|---|---|---|
| Microbe | Yeast | Lactic Acid Bacteria |
| Substrate | Sugar | Carbohydrates and Sugar |
| Oxygen | Present | Absent |
| Byproduct | Alcohol + CO2 | Lactic Acid + CO2 |
| Secondary Process | Acetobacteria convert alcohol to vinegar |
|
| Food Characteristics | Alcoholic, Bubbly | Tart, tangy, softer |
| Tasty Examples | Beer, Wine | Sauerkraut, Yogurt |
I know them’s fightin’ words, so please give feedback in the comments.
Fresh cheese curds are squeaky.
You didn’t know that? Yeah, neither did I, until I had the squeakyness explained…
Thanks to Joe Dobosy and Mich Minoura for explaining squeaky cheese curds, to Hook’s Creamery for jalapino cheese curds, and to Carl Geissbuhler of Brunkow Cheese for explaining why cheese curds are squeaky.
For your viewing pleasure, I shot and edited some video of the Dane County Farmer’s Market (DCFM) while we were at our vacation in Madison. I wanted to give everybody a sense of what an insanely huge Farmer’s Market goes on every Saturday in Madison.
For size comparison, I’ve taken two Google Map images of the permanent site of the Norwich Farmer’s Market, our regular market here in Vermont, and an image of the DCFM, highlighting in red the streets that are lined with vendors.

Dane County Farmer’s Market takes up 8 city blocks around the Capitol Square in Madison.

The Norwich Farmer’s Market occupies a permanent space.
So I need to address the obvious – What is a locavore? The most boilerplate comes from the very first post of this blog – The dictionary definition, “A person whose diet consists only or principally of locally grown or produced food.” There’s two problems I have with this definition. First, it frames locavore as a “diet” and second, the definition leaves “local” to be defined elsewhere. Please excuse me as I pick at nits.
I don’t like diets – in the modern use of the word as a set of guidelines on choosing food, not in the Anthropological meaning of the word as anything that people eat. Diets come as arbitrary sets of rules or guidelines that ossify eating practices and attempt to define the world into “good” and “bad” foods. Lard? Bad. Broccoli? Good. Locally-raised pig lard? Bad (unless you’re a locavore, then it’s good). Conventionally farmed broccoli from Argentina available in New Hampshire in February? Good (unless you’re a locavore, then it’s bad…) I really do NOT want anyone to think there is some list of goods and bads making up the Locavore diet and that you may only eat things on the good list and nothing off the bad list. Diet also emphasizes choosing foods and avoiding foods – a universe of possibility that neglects what you do with the foods you choose or what happens to the foods you avoid. I want locavore to mean more than just choosing foods that are good and avoiding foods that are bad because locavore is more than just the food – it’s about preserving food, cooking food and enjoying food too…
Second, the dictionary leaves out what “local” means. The dictionary defines “local” as “belonging or relating to a particular area or neighborhood, typically exclusively so.” Local as geography. So each locavore is a pin on a map with a circle around it. I don’t much like that either. We can use other definitions of “local” to broaden our understanding of food. I think of food using a network definition. Imagine a network of food producers, packagers, distributors and consumers. Each person or organization is a node and is linked by the transactions between nodes. We all eat within this type of network-I buy a can of tomatoes sold at the coop, shipped by a grocery wholesaler, packages by a plant, picked by a person, grown by a farmer. Alternatively I go to my pantry and get a jar of home-canned tomatoes that I bought at a farm stand that were picked by the farmer. Local, to me, means both geography AND relationship networks. How can we act to minimize both distance and connections?
So, I’m being pedantic, but I want to explore these ideas more fully in this blog… This is why I started in the first place. To gain a better understanding of how and why I eat locally.
So back to my original question: What is a locavore? The dictionary says, “A person whose diet consists only or principally of locally grown or produced food.” Let’s modify this…
A locavore is person who acquires, preserves, cooks and eats food in order to minimize the distance between the food production and consumption.
What do you think?
(Frontnote: Yes, I know it’s paté. But I’m going to type pate. Sorry… it’s extra keystrokes.)
We’re going over for a Christmas get-together at a colleague’s house this afternoon. I needed to bring something, and I only know two mushroom finger foods. Mushroom pate and marinated mushrooms. I chose the former. I make this as part of my vegan crudite platter: mushroom pate, cashew cheese, and olive tapenade with pita chips and sesame crackers. Invite me to a party sometime to try it out!
This isn’t my recipe, so I’m not going to replicate it here. (I want other people to respect my copyright as I respect theirs.) I think this is the original recipe I have been using – the proportions seem right. The main ingredients are sauteed mushrooms, onions and garlic, flavored with cumin and curry powder (just a teaspoon of each), pureed in the blender with toasted cashews and a little peanut butter. The onion, garlic and spices add a little depth to the flavor and the cashews and peanut butter give the recipe better body. Pureed mushrooms would just be a mess.
I would usually make crackers to go with this dip, based on the excellent recipe for Olive Oil and Seed Crackers from Clotilde Dusoulier at Chocolate and Zucchini. I admit tho, I had no interest in spending a few hours in the kitchen rolling out dough, so I bought some crackers from the COOP that were basically a scaled production of what I wanted to bring… Intention counts, right?
I’ll catch a photograph later today when I’ve got the pate set out with the crackers. Right now it’s in a bowl under plastic and looks rather grey and unpalatable.

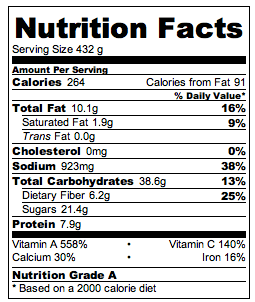
My photography leaves much to be desired. This dish was not as orange as this photo makes it out to be.
The recipe for tonight’s dinner we made up from scratch. We had stuff around the house to make stir fry, but we didn’t quite know how to flavor it. Sam wanted lemon, but I wasn’t in the mood for something tart. By coincidence, we had bought a jar of orange marmalade at the COOP yesterday. TA DAA! A nice complement to hoisin sauce.
In addition, this recipe illustrates one of my favorite cooking techniques – velveting. I learned this technique from the Cooks Illustrated recipe “Marinated Velveted Chicken Stir Fry” from May 2004. Velveting is a common technique used in Asian styles of cooking, but somehow Americanized versions of Asian recipes morphed into “breading.” Take the basic Chinese restaurant-style of preparing sweet and sour chicken: pieces of chicken are dipped in batter and deep fried, producing a breading that soaks up the sweet and sour sauce. Velveting is the same principle, but doesn’t involve the deep frier and produces (I think) a better coating on the chicken (or tofu, in this recipe). In general, velveting involves tossing uncooked meat or tofu in a mixture of oil and cornstarch, coating the meat in a very thin batter-like coating. The meat or tofu is then cooked in a hot pan with very little oil, producing a coat of partially-cooked cornstarch around the meat or tofu. The meat or tofu stays moist because the coating keeps the meat from coming in direct contact with the pan. Then a thin sauce is added to the hot pan, and the sauce combines with the uncooked cornstarch to make the sauce thick and the meat coating “swollen” and rich-tasting. The end product is similar – tender pieces of meat with a thickened sauce. I make most of my stir-fries using this technique. Caveat: it doesn’t work well with fatty beef – the fat makes the coating come off.
Mix cornstarch, vegetable and sesame oil in a large bowl. Add tofu strips and gently toss to coat.
Heat a nonstick pan on medium-high heat. Add a small amount of vegetable oil and swirl to coat the pan. When the oil shimmers, but not smokes, add the tofu in a single layer. (You may need to cook the tofu in two batches.) Don’t shake the pan around – just let one side of the tofu get nicely browned. Methodically turn all of the pieces of tofu to the second side, and again leave the pan alone and let the second side cook. I know this doesn’t seem very stir-fry like, but it’s important to evenly cook the tofu so the breading sticks. If you’re more patient than I am, you can cook the other sides of the tofu, but I usually only cook 2. Put the tofu into a bowl and set aside.
Add a small amount of oil to the hot pan, again swirl to coat and wait for the oil to shimmer. Add the carrots and the napa stems. Toss in the pan to cook about a third of the way to done. Add the cabbage leaves. Splash the vinegar into the pan and QUICKLY cover with a lid. This steams the cabbage leaves. Leave the lid on for a half a minute, then remove and toss the vegetables to spread around the vinegar. When the vegetables are about halfway cooked, tender but still firm, transfer into a bowl and set aside. They’ll keep cooking in the bowl, so pull them off early… Mushy vegetables are yucky in stir fry.
Now to build the sauce. Add a small amount of oil to the hot pan, but leave it in a puddle. When the oil shimmers, pull the pan off the heat. Turn the burner down to medium-low. Add the ginger and garlic into the oil and stir around until everything smells good – 30 seconds maybe? With the pan still off the heat, add the hoisin and marmalade and mix together. Return the pan to the heat (now on medium-low) and let the ingredients cook together until bubbly – a minute or two. Add the chicken stock and stir. Bring the sauce to a simmer.
This is based on this recipe making 2.5 servings (two dinners and one half-sized lunch).
(As a sidenote, until I wrote this post, I thought it was spelled “marmelade.” Learn something new every day!)
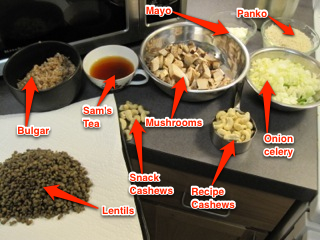
Mise En Place… with a bit of tea and snacking along… Annotations made with Skitch.
EDIT: There’s pictures now… Now I can only apologize for the lack of a final picture of a cooked burger.
So, I’ve found there’s two types of “mushroom burger” – the first is a portobello cap between a bun – a grilled mushroom cap sandwich, as it were. The other is macerated mushrooms with other stuff, made into a patty, and eaten between a bun. This recipe the latter type. But, since it’s a Cooks Illustrated recipe (yet again!) there’s a LOT more to it.
Disclaimer: I didn’t do much of the cooking tonight. Sam had the day off, so he did 95% of the cooking. My contributions were: microwaving frozen peas, opening a can of corn, microwaving said corn, and toasting burger buns. So much of this post is based on Sam’s narrative of making of mushroom burgers.
As an aside, all Cooks Illustrated recipes are sometimes more complex than they need to be… This is the extra work the writers at Cooks put into developing recipes that are reliable, not simple. Cooks is NOT concerned with novice chefs that can’t read a recipe. They expect you to know your way around your well-equipped kitchen. That being said, all of the reliability of their recipes comes with a trade off. Sometimes the steps seem completely unnecessary and pointless. (note my discussion about rehydrating porcini mushrooms from Tuesday) But, when I’m cooking one of their recipes, I follow their instructions religiously.
Onto the mushroom burgers (So says Sam)… Sam doesn’t think this recipe made a “mushroom burger,” just a really good “veggie burger.” There wasn’t enough mushroomyness for him. In the recipe, the mushrooms were only one of four main components. The recipe called for lentils, bulgur wheat, and pakno breadcrumbs, with mayonnaise to bind it together. So the overall impression was not “mushrooms” it was “patty of stuff.” We brainstormed how to make the whole thing more “mushroomy” and the only good idea we could come up with was to use dried shiitake mushrooms ground to a powder as a binder and a way to absorb more moisture. I also though about a “stuffed mushroom burger” where a portobello cap was grilled, then stuffed with mushroom filling and finished under indirect heat, and served on a bun. It would be a hybrid of the mushroom cap sandwich and the veggie burger.
So they’re a time-consuming but tasty substitute to Gardenburgers. We’ll have to do some tests to see how well the formed patties can freeze. Having these on hand in the freezer would make me more likely to cook them again. I’ve come to expect veggie burgers to be a quick dinner, not a 45-minute prep that required the food processor.
Sorry for the lack of pictures – I didn’t take any since I wasn’t cooking. There’s a few pictures hiding on the actual digital camera (I take all my photos on my iPhone), but I don’t know how to get to them…


