ReLocavore: Redefining "local"

Back to Wisconsin, my cheesehead friends


2 Comments

Skewer shrimp for fun and profit

20130713-183816.jpg

Tonight’s dinner was supposed to be fish with fruit salsa. I headed to the coop thinking “tilapia, or maybe salmon…” but was confronted with the Fish Counter Conundrum… The COOP does a good job labeling the origins of fish and seafood, giving information on how the seafood was caught (farmed, netted, hooked, etc) and how sustainable the seafood is: green for good, red for unsustainable. So, yes, I want to do my soft-hearted liberal best to make sure that I Save the World with my purchases… but at the same time, I was confronted with ASTRONOMICAL price differences. Eating sustainable seafood is really damn expensive. This is the Fish Counter Conundrum.

The exception is always shrimp. They’re bioaccumulating biofilters from the bottom of the food chain that live darn near everywhere, can be caught and farmed sustainably, and don’t require a second mortgage to eat. They’re the pigeons of the sea, or the rats of the sea, or something like that… I was able to get 16 shrimp at 12-16 count weight for around $6. They were listed as “sustainable” and had a big green sign saying that I was going to Save the World if I bought shrimp instead of salmon or tilapia.

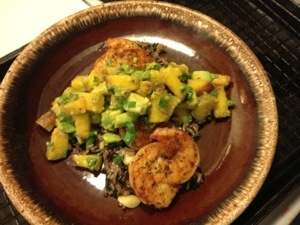
I cooked them under the broiler (we can’t grill at our apartment) with a big sprinkle of paprika, basil and some cayenne. The fruit salsa was peach and avocado with green onion. Underneath was pilaf with almonds – unremarkable and not quite in line with the dish, but hey… I’m a home cook, not a chef. I get to make-do and write it off as a resources problem.


Leave a comment

Wheat berry salad with beet greens, almonds, dried cherries and goat cheese

This is a modified recipe from Mark Bittman’s How to Cook Everything called wheat berries with walnuts. I needed to get rid of a whole bunch of beet greens before they went swishy, so I added them. I think given a nice color.

20130610-172911.jpg

Fast and Easy Meals on the Go

I don’t typically repost stuff from other sites, but I was super-happy to see Fitmodo including a breakfast recipe that I just LOVE to make – Foldover breakfast sandwich.

I can usually add a bunch of sautéed greens into the middle.

Ingredients:

  • Eggs (between two and four)
  • Tortilla (preferably whole wheat)
  • Olive oil (just a few drops)
  • Spices/hot sauce (recommended)
  • Cheese (optional)

Directions:

  • 1. Put just enough olive oil into a non-stick pan (11 inches, or so) so that the eggs won’t stick. Use a paper towel to evenly distribute it. Turn your burner to low-medium.

  • 2. Add your eggs to the pan. You can pre-scramble them in a bowl if you like, or you can just crack them directly onto the pan and puncture the yolks if you’re in a hurry. Let the eggs slowly cook, undisturbed, almost like you’re making an omelette.

  • 3. While the eggs are cooking, take your tortilla and jab it a bunch of times with a fork to create a rough surface. Don’t pierce it all the way through. Once the outside edges of the eggs are mostly cooked but the inside is still runny, lay the tortilla on top of the eggs, rough-side down. Allow them to sit for about 30 seconds so they stick together.

  • 4. Use a spatula to get under the edge of the eggs, then run it the whole way around so that the eggs slide freely. Then carefully flip the whole thing, so it sits tortilla-side down.

  • 5. Allow it to cook this way for another couple of minutes. If you’re going to add some shredded cheese, do so at this time (though you’ll be making it somewhat less healthy). Shake on whatever spices and/or hot sauce you want, too. Remove from heat when the tortilla is crispy, but not burned. Fold it in half, wrap it in a paper towel, and run out the door.


2 Comments

Pepper Pickled Radishes

2013-05-25 16.06.54I like to pickle – to preserve vegetables in a salt and vinegar brine. I pickle for three reasons: First, it’s a way to preserve some veg to eat later in the season. Second, I have a bad salt-sour tooth (like a sweet tooth, but more for salty and sour things). Third, my pickles never turn out the same way twice, so it’s always a surprise when I open a jar.

Sidenote: pickling is not fermenting… They’re different processes. Pickling is killing microbes and reducing  their ability to reproduce by introducing a hot, salty and acidic environment. Fermenting is using the microbes to create a warm and slightly acidic environment that both slows reproduction and breaks down foodstuffs. Some old-school cucumber pickles are both fermented and pickles, but not all.

Another sidenote: Pickling can produce both self-stable pickles and pickles that need refrigeration to keep from spoiling-so-called “refrigerator pickles.” I prefer refrigerator pickles because they’re very easy to make and the resulting veg stays crisp.

To start out this season, I made pepper pickled radishes. These are radishes pickled in a vinegar-salt-sugar brine with peppercorns. They turn a light shade of pink as the color leaches out of the radish into the brine. For a new twist this year, I added a sliced onion. In retrospect, I used too much onion, so these are more pepper pickled onions with some radishes thrown into give it a pink color. As they hang out in the fridge, the pepper flavor gets stronger while the vinegar mellows.

Pepper Pickled Radishes

(Makes 1 pint of radishes. All measurements are approximate… This is the variability I talked about…)

  • 8 radishes – about 1″ in diameter
  • 1 small onion
  • 1 tbsp peppercorns
  • 1 cup rice wine vinegar, apple cider vinegar or white vinegar
  • 6 tbsp salt
  • 2 tbsp sugar
  1. Heat the vinegar, salt and sugar to almost boiling. Taste it and adjust salt and sugar to your preference.
  2. Thinly slice the radishes and the onion on the mandoline.
  3. In a pot of boiling water, sterilize a clean canning jar, ring and lid for 10 minutes.
  4. Fill the sterile, hot jar with layers of radish slices, onion slices and peppercorns. Press firmly to pack the jar very tight. Pour over the hot brine until within 1/2″ of the rim of the jar. Tap the jar firmly on the counter to release air bubbles. If air bubbles are still visible, jam a butter knife down the veg to release the air bubbles. Press down any veg sticking up out of the jar, so it won’t touch the jar lid. Top off the jar with extra brine to reach within 1/4″ of the rim of the jar. Wipe the lip of the jar clean, top with the lid and screw on the ring to hand-tight.
  5. Put the jar in the way back of the fridge. Let cool for at least 24 hours.


3 Comments

White beans and escarole with pasta.

The dinner board lists the veg on hand and the dinners we’ll make with it (I hope). I star the veg that’s going to be used in a specific recipe. FFYS means “fend for yourself”-and means that neither of us are availble to cook that night.

Each week, I strive to look over our store of vegetables and draw up a menu for our dinners. It helps me to focus my grocery and farmer’s market purchases, plus, as I’m walking home from work, I can go over the plans for dinner and be ready to prep when I walk in the door (or after Pidi and I get home from the Dog Park.) As you can see from the board, Sunday night’s dinner was supposed to be “white ends & pasta w/greens” and since it’s Sam’s day off work, he was planning on cooking. He asked me for the recipe, but I realized I had never written this recipe down anywhere. I put pen to paper (figuratively), so Sam didn’t have to develop his psychic abilities to cook recipes that I’ve made up and never written down…

Frisee-style Escarole (via OneDropDream) 
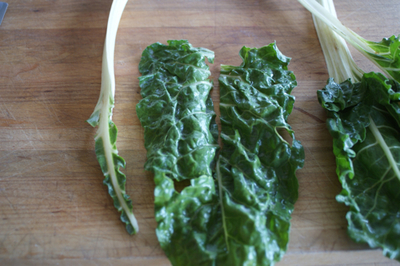
Escarole (Via InMyBox.Wordpress.com)

Escarole is a fleshy lettuce with a mild, bitter taste and is very similar (indistinguishable, I think) from endive. Sometimes, sadistic farmers grow “chicories,” blanched plants that are forced to grow into tight pointed heads. All of these veg – escarole, endive, chicories – are part of the family of Italian cooking greens. For people who don’t like cooked lettuce, think of fleshy Italian cooking greens more like spinach or kale – greens that we cook without batting an eyelash – instead of like lettuce.

Not knowing what to do with escarole, a few years ago, I turned to Farmer John’s The Real Dirt on Vegetables that recommended cooking escarole with pasta in olive oil with garlic, and to Alice Waters who has a recipe for greens and white beans in her Chez Panisse Vegetables cookbook (repo@Serious Eats). I combined the two – because who doesn’t like beans and pasta?

White beans and escarole with pasta

  • 1 head of escarole (see the picture above for sizing)
  • 14.5 oz can of small white beans, great northern beans, white kidney beans or cannelloni*
  • 1 pound small pasta that cook up to be about the same size as a bean**
  • 3-4 garlic scapes
  • olive oil
  • salt and pepper
  • 1/4 cup heavy cream (optional)
  • Shaved parmesan (optional)

*I’ve tried this with dried beans, and you need the thick bean broth from the canned beans to form the basis of the sauce. Don’t try it with dried beans.

**Ditalini is the perfect pasta for this dish since it cooks up to the same size as a bean, but it’s hard to find.  Alternatives are rotini, penne, cut spaghetti or elbow macaroni.

Prep

  1. Wash and dry the escarole and chop or tear it into 2″ pieces. Taste the core and make sure it’s not terribly bitter before including it.
  2. Mince the garlic scapes, omitting the tip of the scape, if dry, and the neck where the scape bulbs into a spade shape.

Cook

  1. Boil water with salt, and cook the pasta until al dente.
  2. While the pasta cooks, heat 1-2 tbsp olive oil in a large skillet over medium heat.
  3. Add the scapes and cook for a minute until they’re soft.
  4. Add the escarole and turn in the olive oil to wilt. If it won’t all fit in the pan (often it doesn’t…) steam the greens by adding all of the escarole to the pan and 2 tbsp water. When it steams, cover the pan for 1-2 minutes until the escarole has wilted and is more manageable. Turn the escarole in the oil to mix around the flavor.
  5. Open the can of beans and pour the whole can, bean sauce and all, into the skillet. Bring the beans and greens to a simmer. Reduce the heat to low and cook until the pasta is done.
  6. Before draining the pasta, reserve a cup of the cooking liquid. This will CYA if there isn’t enough bean juice to coat the pasta and you have to thin it out a little bit.
  7. If the skillet will hold it, add the pasta into the skillet and cook for another minute or two. Otherwise, return the pasta to the pot, and use the heat of the pot to dry off the extra moisture. Add the contents of the skillet and mix. If there’s not enough sauce, thin it out a bit with the reserved cooking liquid.
  8. Taste and adjust the salt and pepper. If you like the dairy thing (this recipe is vegan up until this point), take the pan off the heat and stir in cream.
  9. Top with shaved parmesan, if you like the dairy thing… Parmesan is salty, so don’t over-salt the dish.


1 Comment

Stuffed Chard

A few years ago, I tried to make sushi using chard leaves instead of nori. It was a complete failure, but what emerged was this recipe for stuffed chard.

Stuffed Chard

This recipe makes 8 chard rolls  (4 servings) stuffed with creamy rice.

  • 8 large (about a foot long) pieces of Swiss chard with stems and leaves
  • 8 slices of ham
  • 8 slices of provolone cheese
  • 4 cups cooked rice
  • 4 tender aromatics (ramps, green onions or green garlic)
  • 4 tbsp butter
  • 1/4 cup cream
  • Salt and Pepper
  • 1/2 cup dry white wine

Cook the rice – You’ll have to look elsewhere for directions because I use my rice cooker.

Prepare the vegetables. Wash the chard well and dry in the salad spinner. Lay each piece on the cutting board and make a V shaped cut to remove the stem (See picture). Dice the stems. Set the leaves aside. Similarly, wash and dry the aromatics, and dice the leaves and stems.

Melt 2 tbsp butter in a small skillet or saucepot over medium heat. Sauteé the chard stems and aromatics until soft.

Off the heat, add rice to the sauteed greens, along with an additional 2 tbsp butter and cream. Mix well using a folding motion (to not break the rice grains) until the rice absorbs the additional fat and moisture. The rice should stick together, not be separate grains. (Think sushi rice, rather than Uncle Ben’s.) Add pepper and salt. Don’t skimp on the salt or else the rice will taste boring.

Assemble the Stuffed Chard:

If your chard is very fresh and crisp, like in the picture above, microwave each leaf for 5 to 10 seconds to soften it and make it easier to roll.

Lay the chard leaf on your work surface and close the hole from the stem by crossing over the two “lobes” that were on either side of the stem.  Lay a slice of provolone centered on the leaf. Lay a slice of ham centered on the chard leaf. Using an ice cream scoop, #6 disher or 1/2 cup measure, mound 1/2 cup of rice on the center of the provolone. Starting with the chard, gently roll the chard, ham and provolone around the rice. Add to a 9×9″ glass baking dish with the seam side down. If the roll is wider than about 5″, tuck the ends into the rice.

Repeat these rolls, arranging them 2 across in 4 rows in the glass baking dish. Add 1/2 cup white wine to the baking dish. You can add 2 tbsp melted butter if you’re not watching calories. Cover with plastic wrap. Microwave for 8 minutes on high, then for 8 minutes on 50% power.

Optional: If you really like cheese, take the dish out of the microwave, top with cheese and broil it (6″ from the broiler) for 5 minutes until the cheese is melted and browning.

Serve two rolls per serving, topping with liquid from the bottom of the dish as a sauce.


1 Comment

Braided Sandwich with Ham, Cheese and Apples

20121203-192112.jpg

My mom used to make this sandwich when we were kids, but I think she must have filled it with rutabagas, turnips, and lindberger cheese, because I never really liked it as a kid. However, this recipe is GREAT for grownups, especially grownups who would like to put together something showy to take to a potluck. Mom’s recipe came from some Fleishmann’s cookbook or advertisement – the recipe, as she wrote it, calls for Fleishmann’s yeast by name. I made it with a rough-ground mustard so my dough was speckled with mustard seeds.

I hope that I can use the technology of the internet to help show you how to make this sandwich. I took some in-progress pictures, plus I made a hastly drawn diagram on Penultimate on my iPad. If you don’t get it, I’ll make this again and post a video to Youtube.

(Smother’s Leftover Makeovers, p29.)

4 cups (560g) AP Flour
2 Tbsp sugar
1/2 tsp salt
1 cup water
1/4 cup dijon mustard
2 Tbsp butter
2 packages (14g) rapid rise yeast

1.5 cups cubed ham (1 cm/ 1/4 inch cubes)
1 cup cubed apple
1 cup cubed cheese (I used cow’s milk cheese from Cobb Hill Farms)

Mix flour and salt. Reserve 1 cup flour/salt mix.

Mix water, mustard, sugar and butter in a glass measure cup. Microwave until butter is melted and temperature reaches 125 to 130F.

Add flour to bowl of the stand mixer with the paddle attachment. Drizzle in the liquid until a wet dough forms. Switch to the dough hook. Knead for 4 minutes, adding in the additional 1 cup of flour/salt to reach a firm dough. Let the dough rest for 10 minutes so the glutein relaxes.

Heat the oven to 375F.

Reserve a golf-ball sized piece of dough. Roll the remaining dough out to a 14″x12″ rectangle. Transfer the dough to an oiled baking sheet. Pile the cubed meat, apple and fruit along the middle third of the dough. Cut the outer thirds of the dough into 1″ strips. Fold the strips over to cover the filling, like making a braid. Roll the golf-ball sized piece of dough into a disk, and use it to “plug” the sandwich on the end where you started braiding – the filling won’t fall out this way.

Put the sandwich someplace warm and let the dough rise for 15 to 20 minutes. Brush the sandwich with a beaten egg, making sure to cover the edges and any dough peeking through the braid.

Bake the sandwich in the middle of the oven for 25-35 minutes, rotating halfway.

Let the sandwich sit for 10 minutes to let the cheese firm up before slicing. Serve warm.

20121203-192151.jpg

20121203-192125.jpg2012-12-02 17.19.07


1 Comment

Tofu with Sweet Chili Sauce and Coconut Rice

I don’t quite remember where I got this recipe, but it was the first time that I bought sweet thai chili sauce. Fool that I am, the first time that I made it I thought sweet Thai chili sauce was sriracha. We almost died from the heat of the recipe. No, you may not substitute sriracha for sweet Thai chili sauce. But if you’d like this dish a little spicier, add some additional chile flakes – like the kind you find at an old-school pizzeria next to the shaker of “parmesan cheese.”

For the Rice:

3 units rice
6 oz coconut milk (whole fat, no cheating)
big pinch of salt

Add ingredients to your rice cooker. Fill to the line with water. Close the lid and press the button. Don’t have a rice cooker? Until you get one, you’ll have to figure out how to make rice yourself. Sorry. Once the rice cooker has done it’s magic, stir the rice to distribute the coconut fat throughout the rice.

For the Tofu with Sweet Chili Sauce:

1/4 cup chicken stock
1/4 cup Asian sweet chili-garlic sauce
2 Tablespoons soy sauce
2 Tablespoons rice wine vinegar
2 Tablespoons ketchup
chile flakes
1 block extra-firm tofu
1 Tablespoon vegetable oil

Cut the tofu into similar-sized pieces. (I typically cut mine to 1″ x 1″ x 1/2″. This gives me two broad surfaces to brown and four smaller sides to ignore. It’s easier than trying to brown all six sides of a 1″ cube of tofu.) Place the tofu on a single layer on paper towels or a flour sack towel. Press between two weights for 10 to 30 minutes. The more water you press out, the easier it will be to brown the tofu.

Whisk together the stock, chili sauce, soy, vinegar and ketchup. Add chile flakes to taste.

Heat oil on medium-high in a nonstick pan. Tofu will stick to anything less. Trust me. Nonstick. Unwrap the tofu from the paper. Once the oil shimmers, place the tofu in a single layer in the pan and brown the bottom side. Shake the pan occasionally to make sure the tofu isn’t sticking to the pan or to each other. Flip all of the pieces over and brown the second side. Once the second side is browned, add the sauce and cover (QUICKLY!) with a lid. When the sauce hits the hot pan it splatters EVERYWHERE… so don’t make this if your mother is coming to visit and you don’t have time to clean little red drops off your white party dress and your white kitchen walls. Reduce the heat down to medium and simmer the sauce until it’s thickened, about 10 minutes. Keep shaking the pan to spread the sauce around the tofu cubes.

Serve the tofu with sauce over coconut rice.