ReLocavore: Redefining "local"

Back to Wisconsin, my cheesehead friends

Fast and Easy Meals on the Go

I don’t typically repost stuff from other sites, but I was super-happy to see Fitmodo including a breakfast recipe that I just LOVE to make – Foldover breakfast sandwich.

I can usually add a bunch of sautéed greens into the middle.

Ingredients:

  • Eggs (between two and four)
  • Tortilla (preferably whole wheat)
  • Olive oil (just a few drops)
  • Spices/hot sauce (recommended)
  • Cheese (optional)

Directions:

  • 1. Put just enough olive oil into a non-stick pan (11 inches, or so) so that the eggs won’t stick. Use a paper towel to evenly distribute it. Turn your burner to low-medium.

  • 2. Add your eggs to the pan. You can pre-scramble them in a bowl if you like, or you can just crack them directly onto the pan and puncture the yolks if you’re in a hurry. Let the eggs slowly cook, undisturbed, almost like you’re making an omelette.

  • 3. While the eggs are cooking, take your tortilla and jab it a bunch of times with a fork to create a rough surface. Don’t pierce it all the way through. Once the outside edges of the eggs are mostly cooked but the inside is still runny, lay the tortilla on top of the eggs, rough-side down. Allow them to sit for about 30 seconds so they stick together.

  • 4. Use a spatula to get under the edge of the eggs, then run it the whole way around so that the eggs slide freely. Then carefully flip the whole thing, so it sits tortilla-side down.

  • 5. Allow it to cook this way for another couple of minutes. If you’re going to add some shredded cheese, do so at this time (though you’ll be making it somewhat less healthy). Shake on whatever spices and/or hot sauce you want, too. Remove from heat when the tortilla is crispy, but not burned. Fold it in half, wrap it in a paper towel, and run out the door.


2 Comments

Pepper Pickled Radishes

2013-05-25 16.06.54I like to pickle – to preserve vegetables in a salt and vinegar brine. I pickle for three reasons: First, it’s a way to preserve some veg to eat later in the season. Second, I have a bad salt-sour tooth (like a sweet tooth, but more for salty and sour things). Third, my pickles never turn out the same way twice, so it’s always a surprise when I open a jar.

Sidenote: pickling is not fermenting… They’re different processes. Pickling is killing microbes and reducing  their ability to reproduce by introducing a hot, salty and acidic environment. Fermenting is using the microbes to create a warm and slightly acidic environment that both slows reproduction and breaks down foodstuffs. Some old-school cucumber pickles are both fermented and pickles, but not all.

Another sidenote: Pickling can produce both self-stable pickles and pickles that need refrigeration to keep from spoiling-so-called “refrigerator pickles.” I prefer refrigerator pickles because they’re very easy to make and the resulting veg stays crisp.

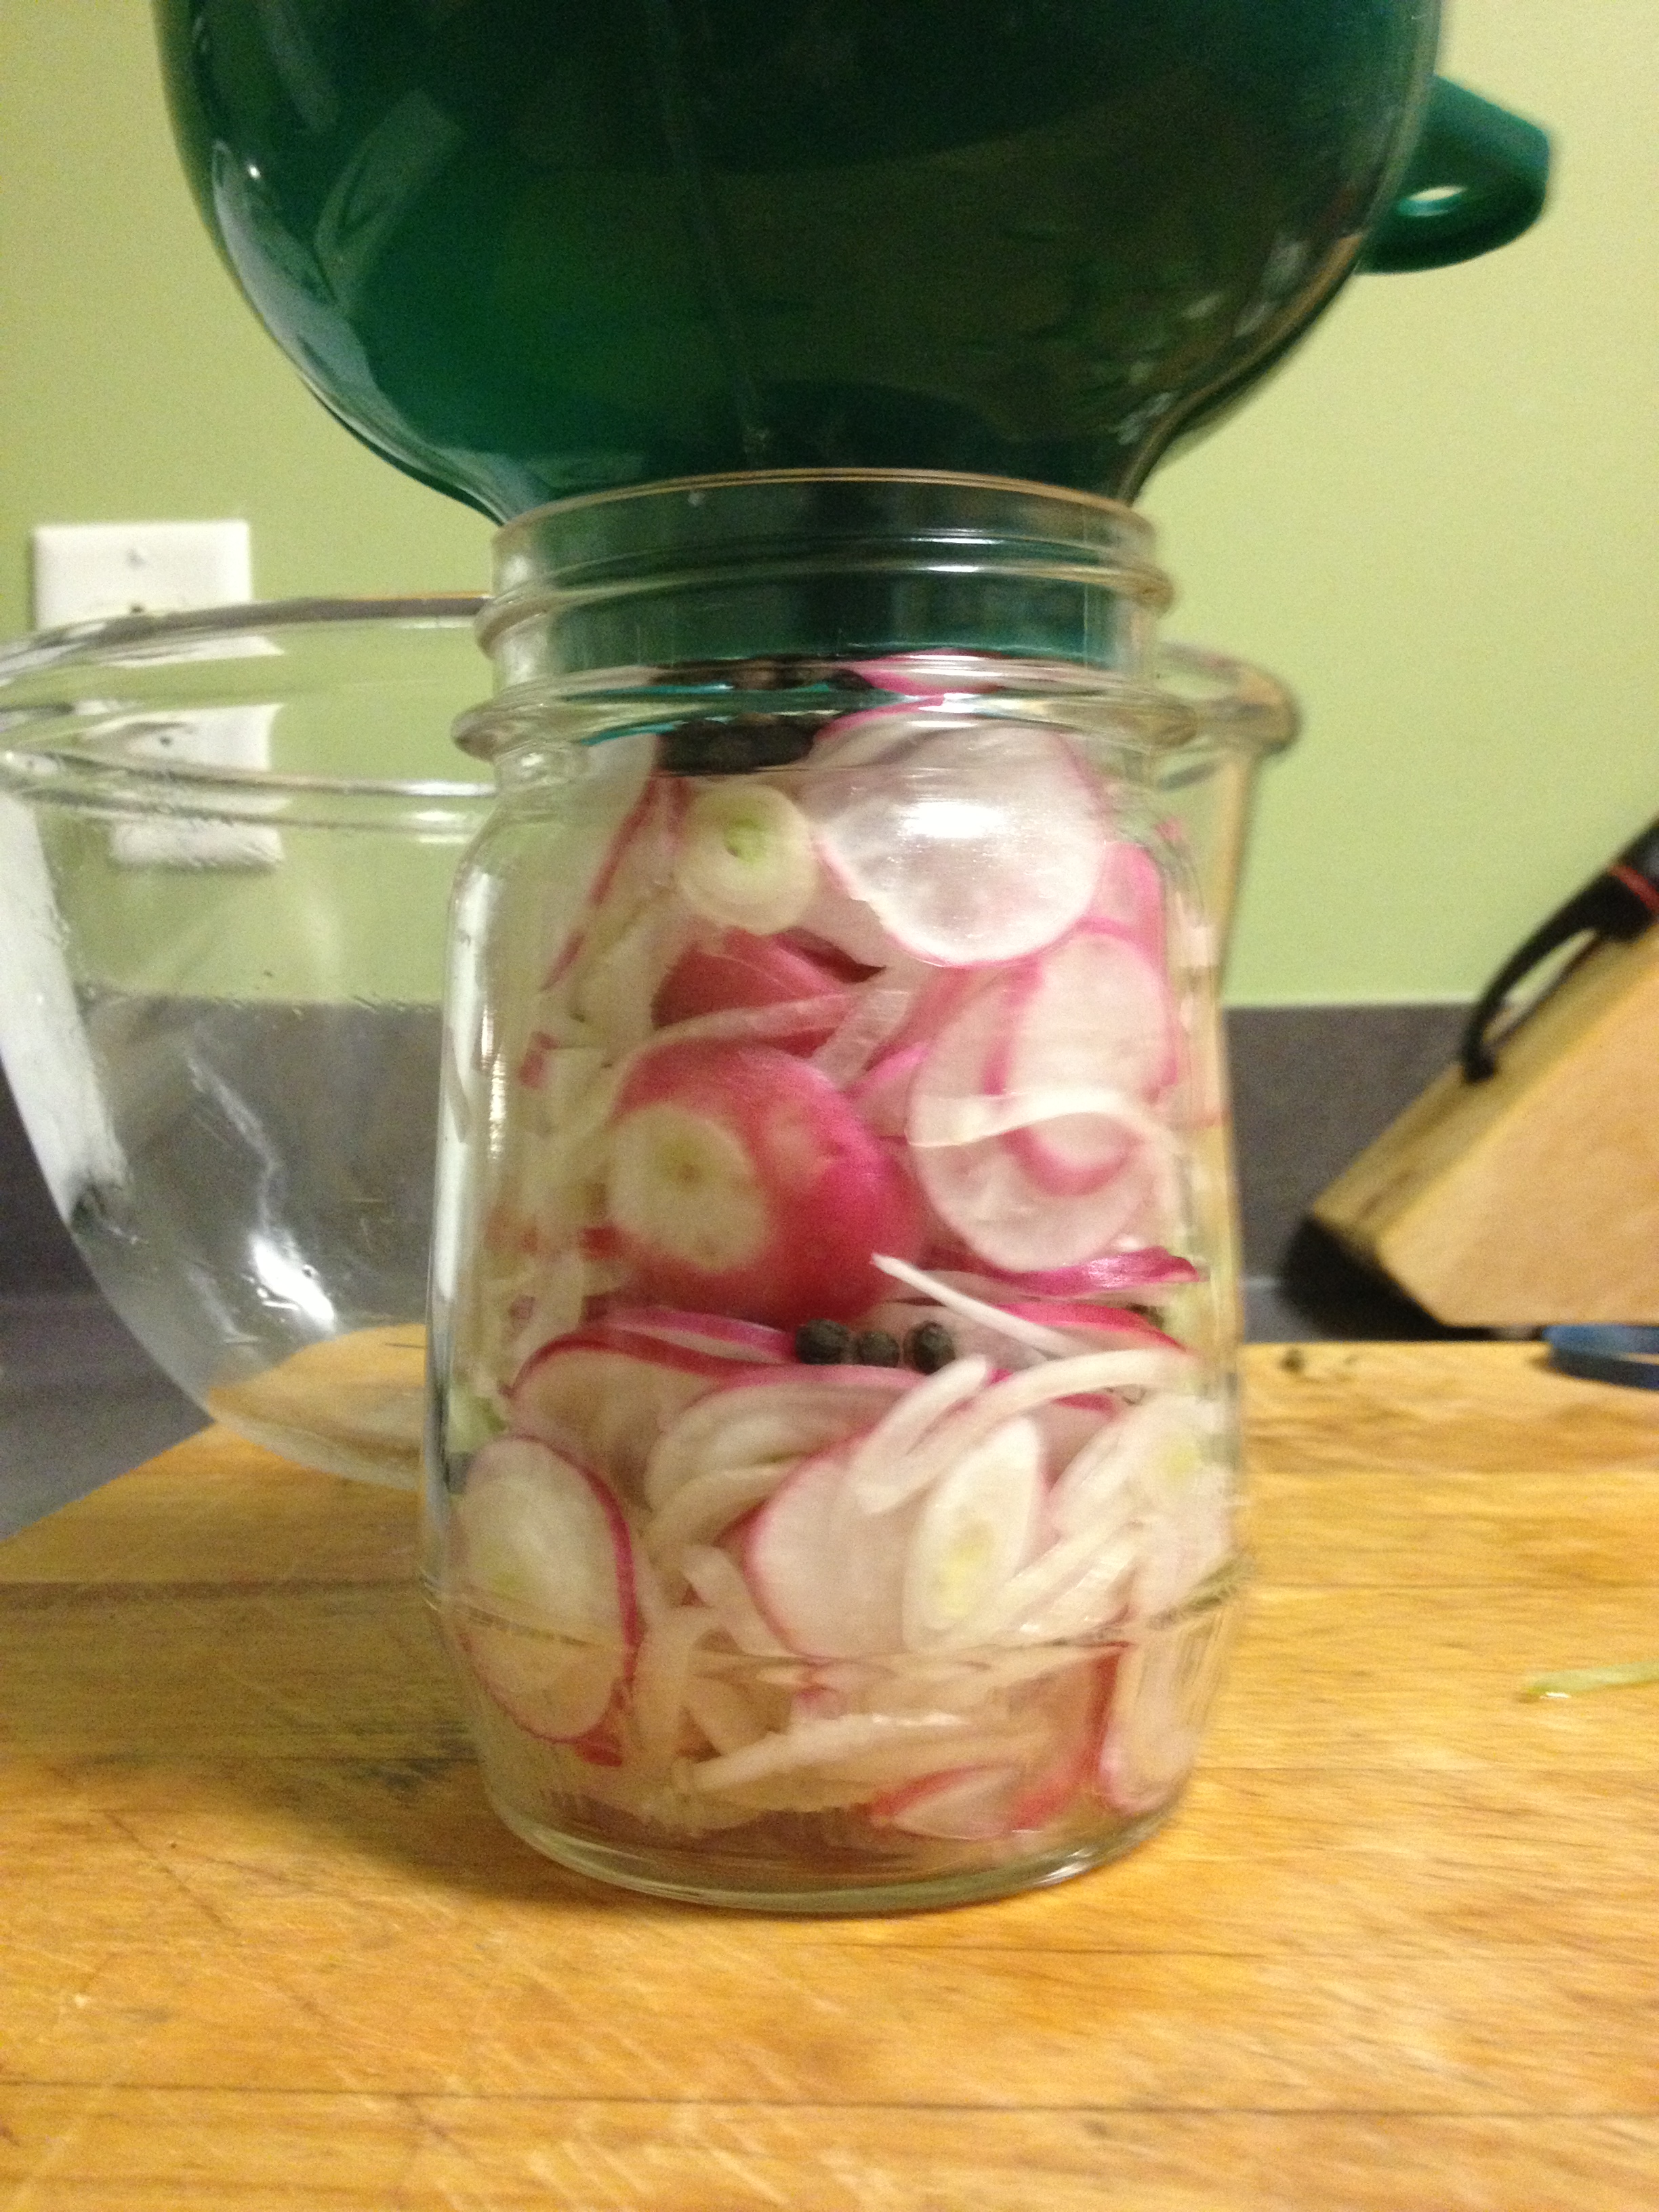
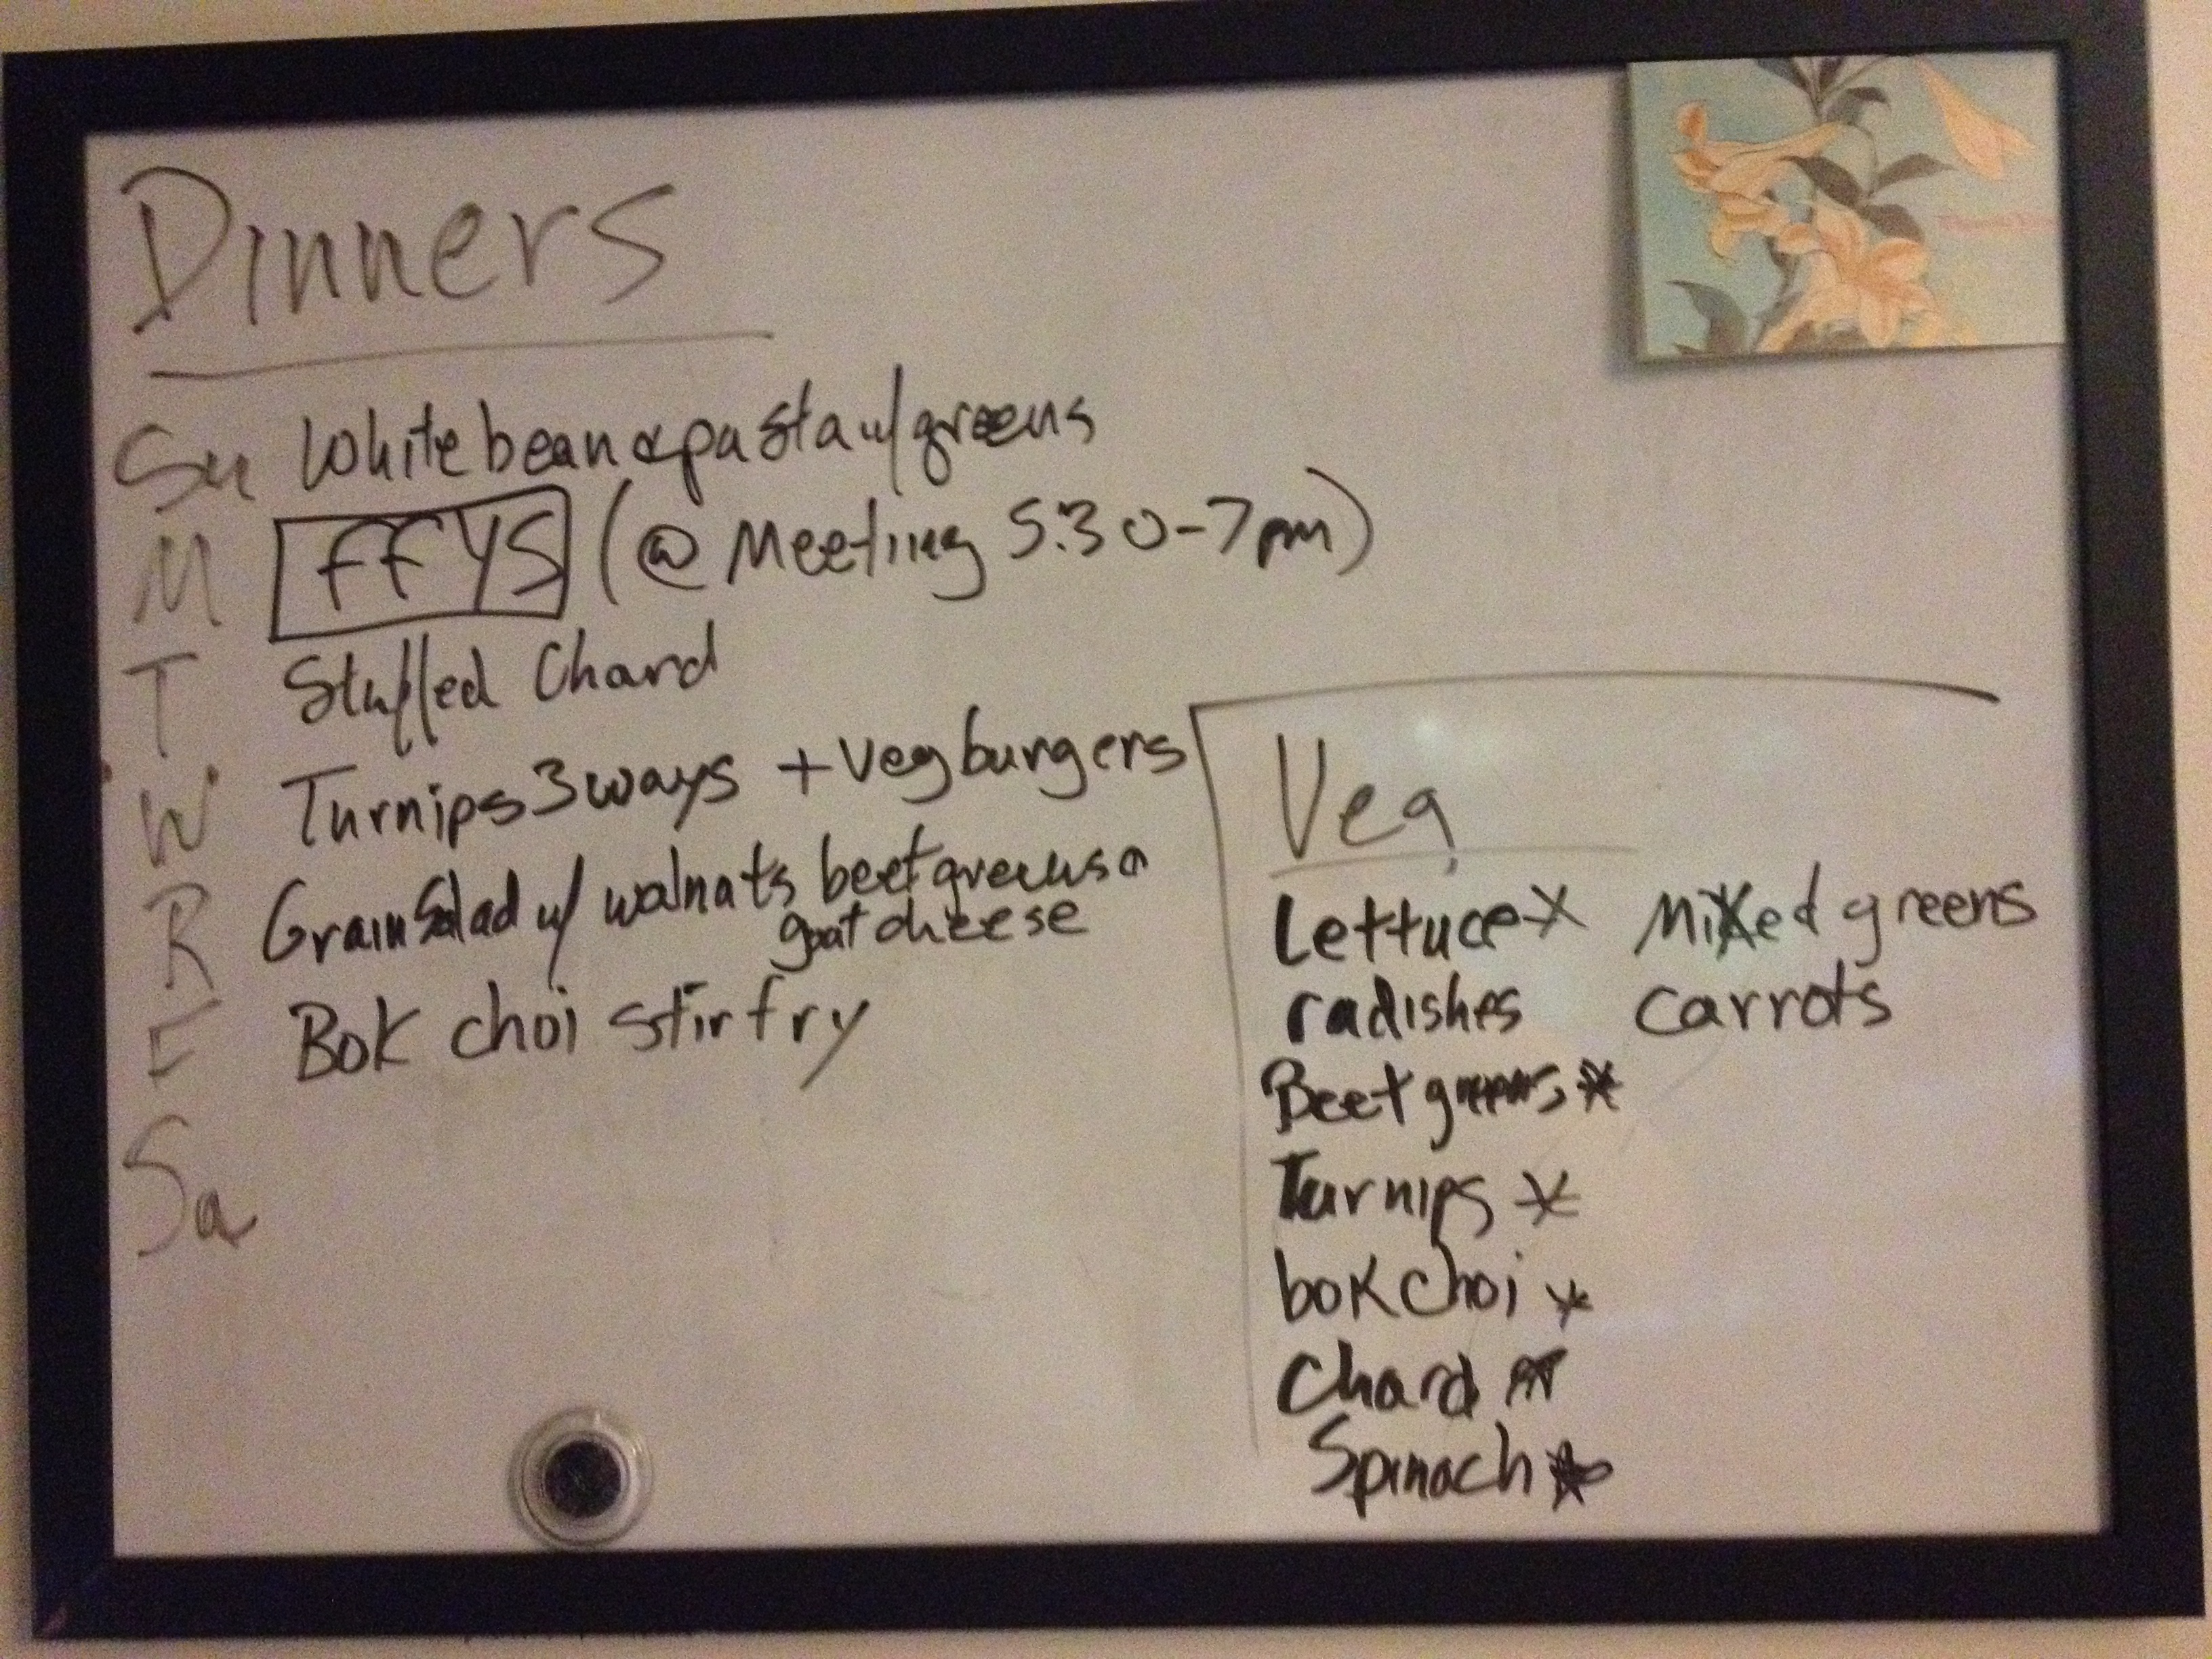
To start out this season, I made pepper pickled radishes. These are radishes pickled in a vinegar-salt-sugar brine with peppercorns. They turn a light shade of pink as the color leaches out of the radish into the brine. For a new twist this year, I added a sliced onion. In retrospect, I used too much onion, so these are more pepper pickled onions with some radishes thrown into give it a pink color. As they hang out in the fridge, the pepper flavor gets stronger while the vinegar mellows.

Pepper Pickled Radishes

(Makes 1 pint of radishes. All measurements are approximate… This is the variability I talked about…)

  • 8 radishes – about 1″ in diameter
  • 1 small onion
  • 1 tbsp peppercorns
  • 1 cup rice wine vinegar, apple cider vinegar or white vinegar
  • 6 tbsp salt
  • 2 tbsp sugar
  1. Heat the vinegar, salt and sugar to almost boiling. Taste it and adjust salt and sugar to your preference.
  2. Thinly slice the radishes and the onion on the mandoline.
  3. In a pot of boiling water, sterilize a clean canning jar, ring and lid for 10 minutes.
  4. Fill the sterile, hot jar with layers of radish slices, onion slices and peppercorns. Press firmly to pack the jar very tight. Pour over the hot brine until within 1/2″ of the rim of the jar. Tap the jar firmly on the counter to release air bubbles. If air bubbles are still visible, jam a butter knife down the veg to release the air bubbles. Press down any veg sticking up out of the jar, so it won’t touch the jar lid. Top off the jar with extra brine to reach within 1/4″ of the rim of the jar. Wipe the lip of the jar clean, top with the lid and screw on the ring to hand-tight.
  5. Put the jar in the way back of the fridge. Let cool for at least 24 hours.


2 Comments

Locavore Survival Guide: Storing Greens in the Fridge

This is the first post of a new series – the Locavore Survival Guide. I hope to provide some advice for novice locavores who are trying out the Farmer’s market, maybe purchasing a CSA (Community sponsored agriculture), or just choosing from the “locally grown” section of the supermarket. After 10 years of eating locally, I hope to have learned a thing or two, and I can share some of my experiences making this same transition. Look for Locavore Survival Guide posts on Tuesday mornings…

Storing Greens in the Fridge

In the early Spring,  my winter stores are low, my kuhlschrank is empty and turned off, and I have more empty canning jars than full. Spring vegetables don’t take well to preserving – they’re leafy and tender. So, in the Spring we scramble to eat all of the veg before it goes mushy.

Some examples of Spring vegetables that we ate in Wisconsin and hope to eat in New Hampshire include: Spinach, radishes, lettuce, asparagus, cooking greens (frisee, endive), Chinese vegetables (bok choi, tatsoi), tiny beets, and sweet salad turnips. Most of these are leaves, a few stems and swollen roots, and no fruits yet…

Most of these leafy greens will wilt and dry out if just put in the refrigerator. Compared to store-bought greens, locally-bought greens will stay crisp and moist much longer in the fridge. The local veg that I get in our CSA is often only 1 or 2 days out of the ground, while some veg in the grocery store may have been picked weeks before. For locally picked veg, by my accounts, you have about 2 days in the fridge with unprotected greens before they’re wilted and inedible. However, if you put a little effort up front, these vegetables will stay very crisp and moist in the fridge, without getting soggy and mildewy. You can plan to pick up your CSA on Friday and still have crisp veg to cook with on the following Thursday. It’s all about moisture control.

First, all leafy greens need to be in a bag to keep in the moisture, but if there’s too much moisture, then the greens with get soggy. To absorb extra moisture, I wrap greens in paper towels, then put them in the bag, and twist the bag shut. This gives an environment where the moisture will stay constant, and any extra will be absorbed by the towels. Store the bagged veg in the bottom of the fridge, in a “crisper” drawer, if you’ve got room. However, bagged like this, the greens should stay crispy for 5 days, longer if they’re really recently picked.

Lay the veg out on a clean, dry paper towel. If the greens are visibly dirty, spray off the dirt, but don't leave too much water clinging to the veg.

Lay the veg out on a clean, dry paper towel. If the greens are visibly dirty, rinse away the dirt, but don’t leave too much water clinging to the veg.

Just like a tiny infant, bring all of the leaves together and tightly wrap in the paper towel.

Bring all of the leaves together and tightly wrap in the paper towel.

Put the paper towel-wrapped veg into a plastic bag. Twist the top closed.

Put the paper towel-wrapped veg into a plastic bag. Twist the top closed.


3 Comments

White beans and escarole with pasta.

The dinner board lists the veg on hand and the dinners we’ll make with it (I hope). I star the veg that’s going to be used in a specific recipe. FFYS means “fend for yourself”-and means that neither of us are availble to cook that night.

Each week, I strive to look over our store of vegetables and draw up a menu for our dinners. It helps me to focus my grocery and farmer’s market purchases, plus, as I’m walking home from work, I can go over the plans for dinner and be ready to prep when I walk in the door (or after Pidi and I get home from the Dog Park.) As you can see from the board, Sunday night’s dinner was supposed to be “white ends & pasta w/greens” and since it’s Sam’s day off work, he was planning on cooking. He asked me for the recipe, but I realized I had never written this recipe down anywhere. I put pen to paper (figuratively), so Sam didn’t have to develop his psychic abilities to cook recipes that I’ve made up and never written down…

Frisee-style Escarole (via OneDropDream) Escarole (Via InMyBox.Wordpress.com)

Escarole is a fleshy lettuce with a mild, bitter taste and is very similar (indistinguishable, I think) from endive. Sometimes, sadistic farmers grow “chicories,” blanched plants that are forced to grow into tight pointed heads. All of these veg – escarole, endive, chicories – are part of the family of Italian cooking greens. For people who don’t like cooked lettuce, think of fleshy Italian cooking greens more like spinach or kale – greens that we cook without batting an eyelash – instead of like lettuce.

Not knowing what to do with escarole, a few years ago, I turned to Farmer John’s The Real Dirt on Vegetables that recommended cooking escarole with pasta in olive oil with garlic, and to Alice Waters who has a recipe for greens and white beans in her Chez Panisse Vegetables cookbook (repo@Serious Eats). I combined the two – because who doesn’t like beans and pasta?

White beans and escarole with pasta

  • 1 head of escarole (see the picture above for sizing)
  • 14.5 oz can of small white beans, great northern beans, white kidney beans or cannelloni*
  • 1 pound small pasta that cook up to be about the same size as a bean**
  • 3-4 garlic scapes
  • olive oil
  • salt and pepper
  • 1/4 cup heavy cream (optional)
  • Shaved parmesan (optional)

*I’ve tried this with dried beans, and you need the thick bean broth from the canned beans to form the basis of the sauce. Don’t try it with dried beans.

**Ditalini is the perfect pasta for this dish since it cooks up to the same size as a bean, but it’s hard to find.  Alternatives are rotini, penne, cut spaghetti or elbow macaroni.

Prep

  1. Wash and dry the escarole and chop or tear it into 2″ pieces. Taste the core and make sure it’s not terribly bitter before including it.
  2. Mince the garlic scapes, omitting the tip of the scape, if dry, and the neck where the scape bulbs into a spade shape.

Cook

  1. Boil water with salt, and cook the pasta until al dente.
  2. While the pasta cooks, heat 1-2 tbsp olive oil in a large skillet over medium heat.
  3. Add the scapes and cook for a minute until they’re soft.
  4. Add the escarole and turn in the olive oil to wilt. If it won’t all fit in the pan (often it doesn’t…) steam the greens by adding all of the escarole to the pan and 2 tbsp water. When it steams, cover the pan for 1-2 minutes until the escarole has wilted and is more manageable. Turn the escarole in the oil to mix around the flavor.
  5. Open the can of beans and pour the whole can, bean sauce and all, into the skillet. Bring the beans and greens to a simmer. Reduce the heat to low and cook until the pasta is done.
  6. Before draining the pasta, reserve a cup of the cooking liquid. This will CYA if there isn’t enough bean juice to coat the pasta and you have to thin it out a little bit.
  7. If the skillet will hold it, add the pasta into the skillet and cook for another minute or two. Otherwise, return the pasta to the pot, and use the heat of the pot to dry off the extra moisture. Add the contents of the skillet and mix. If there’s not enough sauce, thin it out a bit with the reserved cooking liquid.
  8. Taste and adjust the salt and pepper. If you like the dairy thing (this recipe is vegan up until this point), take the pan off the heat and stir in cream.
  9. Top with shaved parmesan, if you like the dairy thing… Parmesan is salty, so don’t over-salt the dish.


Leave a comment

Christmas Cookbooks: from Cooks Illustrated…

An illustration of pig anatomy and pork primals from the Science of Good Cooking from Cooks Illustrated Press, 2012.

An illustration of pig anatomy and pork primals from the Science of Good Cooking from Cooks Illustrated Press, 2012.

As I mentioned in yesterday’s post, I got a lot of cookbooks for Christmas. Today, I’m going to review the three cookbooks that I got from Cooks Illustrated. Two books are hardbound annuals, and the other is a new cookbook based on techniques.

The hard bound annual editions are like the hard bound journals in academic libraries… Take all of the paper monthly journals for the year and slap them between two hard covers. I have been amassing these annual editions since I became a Cooks Illustrated subscriber in 2005. This year, Sam gave me the 2001 and 2009 editions. 2001 was working back in the timeline, and for some reason, I never got the 2009 edition.

Illustration of moisture expelled from roasts after variable minutes of resting.

Illustration of moisture expelled from roasts after variable minutes of resting.

The cookbook The Science of Good Cooking is a collection of recipes and techniques arranged around a common scientific/cooking/chemistry concept. Each section describes the science behind the concept, illustrates how the concept works in cooking using laboratory-like experiments, and then presents recipes that utilize the concept. For example, concept #3 is “Resting Meat Maximizes Juiciness.” In this chapter, the concept is presented as resting meat reabsorbs expelled water back into muscle fibers. Then they test the concept by resting equal-weight roasts for different amounts of time (0 to 40 minutes) then measuring the amount of liquid expelled after slicing. Then they include a table summarizing the amount of time to rest meats, based on similar tests. Then there are recipes using the resting technique to increase moistness: grilled flank steak and pork roast.

Bibliography

The Editors at America’s Test Kitchen and Crosby, G. The Science of Good Cooking. 1st ed. Brookline, MA: America’s Test Kitchen; 2012. ISBN: 978-1-933615-98-1. Details at CooksIllustrated.com.

The Editors of Cooks Illustrated. Cooks Illustrated. 2001 Bound Annual Ed. Brookline, MA: Boston Common Press LLP; 2001. ISBN: 0-936184-56-6. Details at CooksIllustrated.com.

The Editors of Cooks Illustrated. Cooks Illustrated. 2009 Bound Annual Ed. Brookline, MA: America’s Test Kitchen Press; 2009. ISBN: 1-933615-49-4. Details at CooksIllustrated.com.


Leave a comment

Christmas Cookbooks: How to Cook Everything (The Red Book)

Four cookbooks. Cooks Illustrated Bound Annuals from 2001 and 2009. The Science of Good Cooking from Cooks Illustrated, 2012. How to Cook Everything (The Red Book) by Mark Bittman, 2008.

Four cookbooks. Cooks Illustrated Bound Annuals from 2001 and 2009. The Science of Good Cooking from Cooks Illustrated, 2012. How to Cook Everything (The Red Book) by Mark Bittman, 2008.

I made out like a bandit this Christmas for Cookbooks. Thanks to my husband, Sam and to my Mom for these most excellent reference books. I want to describe these books a little bit and give you a flavor of how I expect them to be useful in the future.

How to butterfly a chicken. Illustrations from How to Cook Everything (the Red Book) by Mark Bittman, 2008. Illustrations by Alan Witschonke.

How to butterfly a chicken. From How to Cook Everything (the Red Book) by Mark Bittman, 2008. Illustrations by Alan Witschonke.

Bittman’s book, How to Cook Everything – I call it the Red Book – is the modern version of the original Fannie Farmer Boston Cooking School cookbook or the Betty Crocker cookbook. It’s the one book that a cook needs in order to make most every basic recipe. Bittman incorporates the international cooking style that has come to be known as “American” cooking – a little French, a little Italian, a little Asian, a little Middle-eastern, and a lot of reliance on equipment and seasonings. Bittman also gives ample space to specific techniques – Illustrated by Alan Witschonke in pen and ink. There’s none of the “food porn” photography. Not too many “weird” parts of animals. Not too many pointless variants on the same recipe. He avoids specialty ingredients like black garlic, san marzano tomatoes, etc, that clutter up recipes from famous Restaurant chefs. Want to make waffles? There’s a recipe. Want to cook black beans? There’s a recipe. Want to know how done to cook a chicken thigh? There’s a table. Want to know the correct ratio of fat to flour in a pie dough? Look it up. (although Barahm’s The Science of Cooking and Ruhlman’s Ratio to a better job). Just like Julia Child’s Mastering the Art of French Cooking, this cookbook will be a “sticky note” cookbook – meaning there are specific recipes that I frequently turn to as staples of my cookery.

Screen shot from the How to Cook Everything (The Red Book) for iPhone.

Screen shot from the How to Cook Everything (The Red Book) for iPhone.

I originally found the Red Book by necessity. On my shelf I have one “generic” cookbook – Fanny Farmer’s Boston School Cookbook – and I find myself turning there (and to general internet searches) to find recipes for making “basic” stuff that I can’t just make up without a recipe. For example, I can bake an apple crumble without a recipe, just as long as I can remember the ratio of butter::nuts::oats::flour::sugar that goes into the topping. I don’t have any intuitive sense for how much water to use when cooking beans or grains, so I have to look it up each time. To me, it doesn’t matter what type of nuts or what type of sugar, what type of bean, or how much water… I just need a sense of how much to put together. Fanny Farmer is good for older types of cooking, like pie dough and sweet and sour cabbage, but is very lacking in newer American food trends. I had no idea how to make hummus… Fanny Farmer didn’t tell me much of anything and the internet was saturated with bad, unreliable and untested recipes. (I hate 99% of internet recipes… but that’s another tale… )I needed a cookbook that had recipes for basic but more modern foodstuffs.

I had been introduced to the Red Book a few years ago when learning how to poach an egg. Bittman gives plenty of time for technique on this basic “recipe” – add vinegar to the simmering water, crack the egg onto a plate to ease transition into the water, swirl the water to create a vortex for the egg, spoon water over the yolk to set it, trim off the threads. Does it count as a recipe when the ingredients are an egg, a splash of vinegar and water? Here the Red Book shines with excellent technique.

So, to sum up the Red Book: It’s a basic cookbook with good techniques and basic recipes for standard dishes. Everything is very practical. The recipes are well-tested and are reliable.

Bibliography

Bittman M. How to Cook Everything: 2,000 simple recipes for great food. Tenth Anniv. Ed. Hoboken, NJ: John Wiley & Sons, Inc; 2008. ISBN: 978-0-7645-7865-6.


Christmas Cookies

1 Comment

This year I didn’t go wild with the Christmas cookies. Frankly, we don’t know enough people here to offload so many cookies!

This gallery contains 4 photos


1 Comment

Braided Sandwich with Ham, Cheese and Apples

20121203-192112.jpg

My mom used to make this sandwich when we were kids, but I think she must have filled it with rutabagas, turnips, and lindberger cheese, because I never really liked it as a kid. However, this recipe is GREAT for grownups, especially grownups who would like to put together something showy to take to a potluck. Mom’s recipe came from some Fleishmann’s cookbook or advertisement – the recipe, as she wrote it, calls for Fleishmann’s yeast by name. I made it with a rough-ground mustard so my dough was speckled with mustard seeds.

I hope that I can use the technology of the internet to help show you how to make this sandwich. I took some in-progress pictures, plus I made a hastly drawn diagram on Penultimate on my iPad. If you don’t get it, I’ll make this again and post a video to Youtube.

(Smother’s Leftover Makeovers, p29.)

4 cups (560g) AP Flour
2 Tbsp sugar
1/2 tsp salt
1 cup water
1/4 cup dijon mustard
2 Tbsp butter
2 packages (14g) rapid rise yeast

1.5 cups cubed ham (1 cm/ 1/4 inch cubes)
1 cup cubed apple
1 cup cubed cheese (I used cow’s milk cheese from Cobb Hill Farms)

Mix flour and salt. Reserve 1 cup flour/salt mix.

Mix water, mustard, sugar and butter in a glass measure cup. Microwave until butter is melted and temperature reaches 125 to 130F.

Add flour to bowl of the stand mixer with the paddle attachment. Drizzle in the liquid until a wet dough forms. Switch to the dough hook. Knead for 4 minutes, adding in the additional 1 cup of flour/salt to reach a firm dough. Let the dough rest for 10 minutes so the glutein relaxes.

Heat the oven to 375F.

Reserve a golf-ball sized piece of dough. Roll the remaining dough out to a 14″x12″ rectangle. Transfer the dough to an oiled baking sheet. Pile the cubed meat, apple and fruit along the middle third of the dough. Cut the outer thirds of the dough into 1″ strips. Fold the strips over to cover the filling, like making a braid. Roll the golf-ball sized piece of dough into a disk, and use it to “plug” the sandwich on the end where you started braiding – the filling won’t fall out this way.

Put the sandwich someplace warm and let the dough rise for 15 to 20 minutes. Brush the sandwich with a beaten egg, making sure to cover the edges and any dough peeking through the braid.

Bake the sandwich in the middle of the oven for 25-35 minutes, rotating halfway.

Let the sandwich sit for 10 minutes to let the cheese firm up before slicing. Serve warm.

20121203-192151.jpg

20121203-192125.jpg2012-12-02 17.19.07


1 Comment

Mushroom Week Day 4: Mushroom Burgers

Mise En Place... with a bit of tea and snacking along...

Mise En Place… with a bit of tea and snacking along… Annotations made with Skitch.

EDIT: There’s pictures now… Now I can only apologize for  the lack of a final picture of a cooked burger. 

So, I’ve found there’s two types of “mushroom burger” – the first is a portobello cap between a bun – a grilled mushroom cap sandwich, as it were. The other is macerated mushrooms with other stuff, made into a patty, and eaten between a bun. This recipe the latter type. But, since it’s a Cooks Illustrated recipe (yet again!) there’s a LOT more to it.

Disclaimer: I didn’t do much of the cooking tonight. Sam had the day off, so he did 95% of the cooking. My contributions were: microwaving frozen peas, opening a can of corn, microwaving said corn, and toasting burger buns. So much of this post is based on Sam’s narrative of making of mushroom burgers.

As an aside, all Cooks Illustrated recipes are sometimes more complex than they need to be… This is the extra work the writers at Cooks put into developing recipes that are reliable, not simple. Cooks is NOT concerned with novice  chefs that can’t read a recipe. They expect you to know your way around your well-equipped kitchen. That being said, all of the reliability of their recipes comes with a trade off. Sometimes the steps seem completely unnecessary and pointless. (note my discussion about rehydrating porcini mushrooms from Tuesday) But, when I’m cooking one of their recipes, I follow their instructions religiously.

Onto the mushroom burgers (So says Sam)… Sam doesn’t think this recipe made a “mushroom burger,” just a really good “veggie burger.” There wasn’t enough mushroomyness for him. In the recipe, the mushrooms were only one of four main components. The recipe called for  lentils, bulgur wheat, and pakno breadcrumbs, with mayonnaise to bind it together. So the overall impression was not “mushrooms” it was “patty of stuff.” We brainstormed how to make the whole thing more “mushroomy” and the only good idea we could come up with was to use dried shiitake mushrooms ground to a powder as a binder and a way to absorb more moisture. I also though about a “stuffed mushroom burger” where a portobello cap was grilled, then stuffed with mushroom filling and finished under indirect heat, and served on a bun. It would be a hybrid of the mushroom cap sandwich and the veggie burger.

So they’re a time-consuming but tasty substitute to Gardenburgers. We’ll have to do some tests to see how well the formed patties can freeze. Having these on hand in the freezer would make me more likely to cook them again. I’ve come to expect veggie burgers to be a quick dinner, not a 45-minute prep that required the food processor.

Sorry for the lack of pictures – I didn’t take any since I wasn’t cooking. There’s a few pictures hiding on the actual digital camera (I take all my photos on my iPhone), but I don’t know how to get to them…


Leave a comment

Mushroom Week Day 3: Mushroom Risotto

Mushroom Risotto (Cooks Illustrated Sept/Oct 2003)

Mushroom Risotto. Tastes better than it looks. Srsly. (Cooks Illustrated Sept/Oct 2003)
Arborio rice on the bottom. Japonica rice on the top. The arborio is whiter because it has more starch and less protein. Note that the shape is even stumpier than Japonica. (Japonica or "sushi rice" is basic Japanese short-grain rice.) Arborio rice on the bottom. Japonica rice on the top. The arborio is whiter because it has more starch and less protein. Note that the shape is even stumpier than Japonica. (Japonica or “sushi rice” is basic Japanese short-grain rice.)

Risotto is fancy Italian garbage rice. In general, risotto is made by toasting rice in butter, then cooking the rice slowly with little infusions of flavorful liquid while stirring, and stirring and stirring and stirring and stirring and stirring and stirring and stirring and stirring and stirring and stirring and stirring and stirring and stirring and stirring, then add butter or cheese. Voila!

The key to risotto is the special arborio rice. The grains have two unique characteristics: they’re high in starch and shaped more like a football than a sausage. Because the arborio rice grains are stumpy, football-shapes, they are less likely to break while stirring and stirring and stirring and stirring and stirring and stirring and stirring. Since the grains have lots of starch, all of that stirring rubs the starch grains against each other, sloughing off starch on the outer layer of the cooking grain and mixing it into the interstitial cooking space, making the risotto creamy.

We didn’t just have risotto for dinner, we had mushroom risotto. Again, this is a Cooks Illustrated Recipe (Sept/Oct 2003). To get lots of mushroom flavor the recipe has two important elements. One, like yesterday’s mushroom ragu, the recipe uses rehydrated porcini mushrooms and their broth. Second, the recipe adds soy sauce, which has lots of “brown” or umami flavors. So, in the risotto is 1 oz reconstituted porcini mushrooms (about 1 cup when rehydrated and minced) plus the caps of crimini mushrooms, cut into quarters instead of slices, so they hold together during cooking. The dish is finished with salty parmesan cheese, some parsley for color, and a bit of butter. Took about an hour to prep and cook.