
 On top of all of the canning, salsa-ing, and saucing, I also dry tomatoes. Home-dried tomatoes aren’t much like the store-bought variety. Production driers are much more efficient than home models and mass-produced dried tomatoes typically go through a handful of steps to reach their final state – salting to soften the flesh of unripe tomatoes, juicing to remove the seeds and jelly, flash-cooking to kill off any microbes, and then finally, drying in a temperature and humidity controlled environment. I’m sure somewhere there’s a farmer laying halved tomatoes on muslin in the Mediterranean sunshine, but I certainly can’t afford his product…
A note on the types of tomatoes to dry… I tried to dry slicing tomatoes, cut into slices or wedges, but neither came out good. I typically dry roma tomatoes that are shaped like pears and 3-5″ long. The insides of these tomatoes have more flesh than jelly, and few inner compartments to hold the jelly and seeds.
Putting Food By has, by far, the best method for drying tomatoes. My tomatoes come out pliable and flavorful and keep their red color. Their method has four steps:
- Wash the tomatoes. Cut in half and remove the seeds and jelly. Tear out any pith or rib, resulting in a uniformly-thick tomato “cup.”
- Lay the tomatoes on a cutting board, cut-side-up, and sprinkle with 1 tsp salt per 1 lb tomato. Weight with another cutting board. Let rest for an hour.
- After resting, boil 1″ of water in a deep stock pot. Place the tomatoes cut-side up in a single layer in a metal drop-in steamer basket or a Chinese bamboo steamer. Tip out an juices that accumulated in the center of the tomato. Steam for 3-4 minutes until the flesh is hot and softened. The tomatoes have been over-steamed if the tomato falls apart into mush. The steam blanch locks in the reds color, kills off surface microbes and pre-heats the flesh so the total drying time is less than 6 hours.
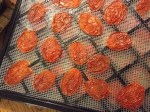
- Preheat your dryer to 120-135F. Transfer the tomatoes, cut side down, to the drying racks. Dry until the tomatoes are leathery but pliable. Rotate the trays every hour by moving the tomatoes closest to the heating element away from the heat. Once the tomato edges are dry, flip the tomatoes over so the cut side is on top. No dryer is perfect, and the tomatoes are all different sizes and thicknesses, so all of the tomatoes don’t come to dry at the same time. Keep an eye on the dryer, checking every hour, and pull out the tomatoes that get dry first. Rotate the tomatoes that are thicker or are taking more time to dry to the warm spots in the dryer nearest to the heating element.


To help explain the texture of a well-dried tomato, I’ve made this short video on YouTube that illustrates a well-dried tomato and tomatoes that are over- and under-dry. Hope this helps!
Once the tomatoes are dry, they need to be cured for a few days. Put them in a big container with lots of room for them to move. Shake the container twice a day and check for any mold. The curing step does two things. First, the tomatoes aren’t evenly dry and this step helps even out the overall moisture – the over-dry edges get a bit more moisture and the moist middles dry out a little more. Second, if mold is going to develop, it will develop in these first few days, so you can pull out the moldy tomatoes before the mold spreads to the whole batch.
After a week, pack the tomatoes into zipper bags or a recycled canning jar. Keep out of direct sun.

September 9, 2013 at 1:24 pm
What kind of food dehydrator do you use? I’m considering getting one.
September 9, 2013 at 1:38 pm
I have an Excalibur 5 tray without a timer. Highly recommended. Its great. http://www.excaliburdehydrator.com/dehydrators/5-tray/5-tray-small-excalibur-3500-black
September 9, 2013 at 1:35 pm
Since my tomatoes were cherry and grape, they dried inconsistently. I’ve got them in a big bowl and will try your container method.
September 9, 2013 at 1:36 pm
Curing them really helps. Plus, I dote over my dryer and pick out ones as they dry.
Did you watch the video? Did it help?